Complete Setup Process for VMC Compliance
As more CEOs, CMOs, and CTOs push for inbox-level brand recognition, Verified Mark Certificates (VMCs) are quickly becoming a strategic priority for marketing and IT teams. But while leadership drives the initiative, it’s the responsibility of IT administrators, security professionals, and developers to make VMCs work — technically and securely.
If you’re planning to purchase a Verified Mark Certificate (VMC), you’ll need to demonstrate domain-level authenticity, secure your outbound emails, and comply with standards such as DMARC and BIMI. This technical checklist will help you obtain a VMC without complications. We’ll guide you through the complete technical setup, verification process, and best practices to ensure a smooth approval experience.
Step-by-Step Verified Mark Certificate Setup Guide
Obtaining a Verified Mark Certificate (VMC) is straightforward when you follow these step-by-step instructions:
Step 1: Implement DMARC Authentication Protocol
DMARC is essential for securing your domain’s email traffic. It builds on SPF and DKIM, so you must ensure both are properly configured before implementing Domain-based Message Authentication, Reporting & Conformance (DMARC). Once those are in place, follow these steps:
Before You Begin
- You need access to your domain’s DNS settings. If you don’t manage them yourself, please ask your domain administrator for help.
- Use a text editor (e.g., Notepad++, Vim, Nano) for record creation.
-
Implement SPF and DKIM
SPF and DKIM must be correctly configured before enabling DMARC. Messages sent from your domain may face delivery issues if these protocols are not set up properly. Wait at least 48 hours after configuring SPF and DKIM before proceeding with DMARC.
SPF Setup:
- Identify all authorized IP addresses that send emails from your domain, including:
- Any third-party mail services (e.g., Google Workspace, Microsoft 365, Mailchimp)
- Your Web server
- ISP’s mail server
- In-office mail server
-
Example of SPF record:
v=spf1 ip4:1.2.3.4 ip4:2.3.4.5 include:thirdparty.com -all
- Use an SPF validation tool to verify correctness.
DKIM Setup
- Generate a public-private key pair for your domain:
- Windows: Use PUTTYGen
- Linux/Mac: Use ssh-keygen
- Choose a DKIM selector (e.g., standard._domainkey.example.com). DKIM selector name follows your email provider’s recommendations. Some providers have predefined selectors. For example, Gmail uses google._domainkey, and Microsoft uses selector1._domainkey. Check your email service’s documentation for the correct format.
-
Example of DKIM record:
v=DKIM1; p=YourPublicKey
- Upload your DKIM public key to the domain’s DNS configuration.

Tip: If you add or remove email services, update SPF & DKIM DNS records right away. Outdated SPF entries or expired DKIM keys lead to failed checks, DMARC misalignment, and deliverability issues.
- Identify all authorized IP addresses that send emails from your domain, including:
-
Set Up a Mailbox for DMARC Reports
Create a group or mailbox to receive and manage DMARC reports. The number of reports you receive will depend on the volume of emails sent through your domain. These reports will indicate whether messages from your domain pass SPF and DKIM authentication.
-
Authenticate Third-Party Email Senders
If you use third-party email services, confirm their emails pass SPF and DKIM checks.
- Add the provider’s sending IP addresses to your SPF record.
- Confirm that emails sent by third-party services are signed with DKIM.
- Use SMTP relay settings if required to route outgoing mail properly.
-
Prepare and Monitor Your DMARC Record
Your DMARC record defines the policy for handling unauthenticated emails and provides reporting instructions. Start with monitoring (p=none) before enforcement to identify issues.
Example Initial DMARC Record (Monitoring Mode)
v=DMARC1; p=none; rua=mailto:dmarc@example.com
- p=none allows monitoring without rejecting emails.
- rua=mailto:dmarc@example.com specifies where reports should be sent.
After monitoring reports for a few weeks and ensuring all legitimate senders are properly configured, gradually enforce DMARC.
Example Quarantine Mode
v=DMARC1; p=quarantine; rua=mailto:postmaster@example.com;
ruf=mailto:dmarc@example.com; pct=100; adkim=s; aspf=s; fo=1
- p=quarantine moves unauthenticated emails to spam instead of rejecting them.
- pct=100 applies quarantine to all emails.
Once fully confident, move to reject mode:
v=DMARC1; p=reject; rua=mailto:postmaster@example.com,
ruf=mailto:dmarc@example.com; pct=100; adkim=s; aspf=s; fo=1.
- p=reject blocks unauthenticated emails entirely.
- adkim=s; aspf=s enforce strict DKIM and SPF alignment.
- rua=mailto:postmaster@example.com specifies the email address to receive aggregate DMARC reports.
- ruf=mailto:dmarc@example.com specifies the email address to receive forensic (failure) reports.
- pct=100 applies DMARC to all emails.
- fo=1 requests failure reports if either SPF or DKIM fails.
(Note: The v and p tags must be listed first; other tags can be in any order.)
-
Add Your DMARC Record to Your Domain’s DNS
Sign in to your domain host (e.g., GoDaddy, Hostinger) and update your DNS TXT records.
Field Name Value Type TXT Host (Name, Hostname, Alias) _dmarc.example.com (replace example.com with your domain name) Value v=DMARC1; p=reject; rua=mailto:postmaster@example.com, ruf=mailto:dmarc@example.com; pct=100; adkim=s; aspf=s.
(add the string that makes up the TXT record)Note: Some domain hosts automatically add the domain name to the end of the record value. Therefore, the record should be created using just _dmarc instead of _dmarc.example.com. -
Save and Verify Your DMARC Record
After saving, verify the DMARC record using online tools or your domain host’s DNS settings. Double-check the record format to make sure that it is formatted correctly and that DMARC is properly applied to your outgoing emails.
Step 2: Register Your Logo as a Trademark
This requirement confirms that the logo has gone through legal verification at a recognized trademark office.
To check if your logo is already trademarked, you can:
- Consult with a legal team.
- Search for your logo on the World Intellectual Property Organization – WIPO database to check its active trademark status.
To trademark your logo:
- Check Logo Eligibility – The design must meet trademark requirements. Check USPTO’s guide on preparing a mark for filing.
- Identify Goods and Services – Your trademark must be linked to specific business offerings.
- Conduct a Trademark Search – Use the relevant trademark office’s database to check that your logo doesn’t conflict with existing marks.
- Prepare and Submit Application – Gather all the necessary details and file your application.
- Respond to Examiner Requests – You might be asked for additional information after your application has been reviewed. Make sure your responses are quick to avoid rejection.
- Receive Approval or Denial – If approved, your logo will be officially trademarked and eligible for VMC validation.
Step 3: Prepare Your Logo in SVG Tiny PS Format
The logo file used in your VMC certificate must be an SVG file that adheres to the SVG Tiny Portable/Secure (SVG Tiny PS) format. This specification is required for BIMI compliance and VMC validation. Adobe Illustrator does not provide a direct export option for this format. So follow these steps to convert your logo:
-
Convert Your Logo to Vector Format
If your logo is currently in a raster format (e.g., PNG or JPG), you must convert it to SVG format to meet VMC requirements.
The design must be clean and simplified for smooth conversion, especially if your logo contains complex elements. You may need to recreate or refine certain parts, so it scales properly and complies with SVG Tiny PS standards.
-
Export as SVG Tiny 1.2
Once your logo is in vector format, follow these steps in Adobe Illustrator:
- Open your vector file in Illustrator.
-
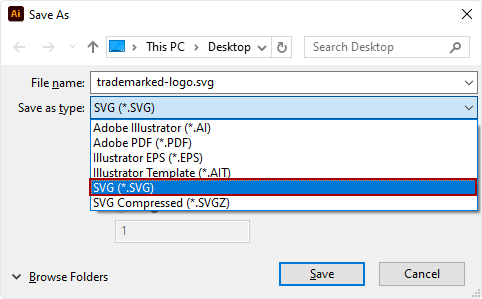
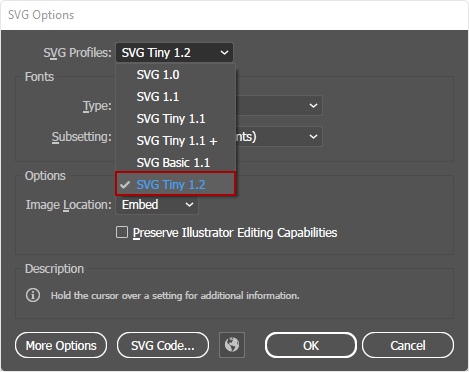
Click File → Save As and choose SVG (*.SVG) as the file format. In the SVG Options dialog box, set SVG Profiles to Tiny 1.2 and click OK to save.


Modify the SVG Code
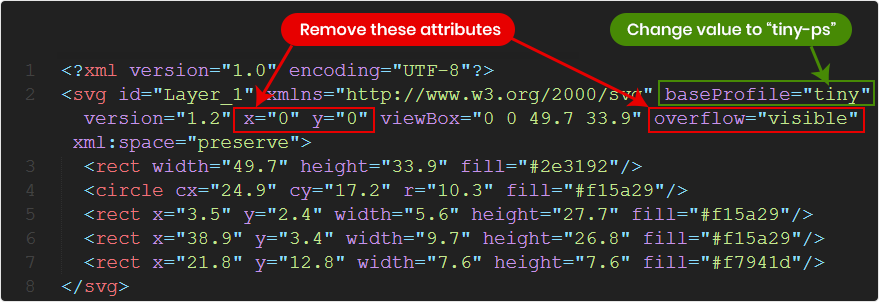
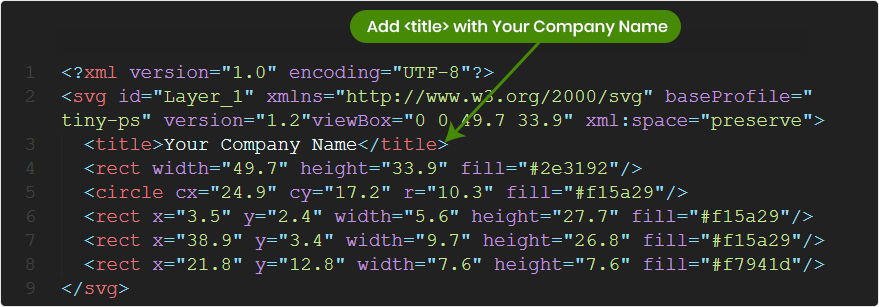
After exporting, the SVG file needs manual adjustments:
- Open the file in a text editor (e.g., Notepad, Notepad++, or a code editor like VS Code).
-
Locate the <SVG> tag and check that it contains the following attributes:
<svg version="1.2" baseProfile="tiny-ps" xmlns="http://www.w3.org/2000/svg" viewBox="0 0 1080 1080">
- If baseProfile is not “tiny-ps”, change it.
-
Remove unnecessary attributes like x=, y=, and overflow.

-
Add a <title> tag right after xml:space=”preserve” to include your company name.

- Line endings must be in LF (Line Feed) format rather than CR LF. Use a text editor to convert line endings if needed:
- Go to View → Show Symbol → Show End of Line to check.
- Use Edit → EOL Conversion → Unix (LF) to correct it.
Alternative: Use an Automated Conversion Tool
The BIMI working group provides an Adobe Illustrator Export Script that automatically converts SVG Tiny 1.2 into SVG P/S format. If you prefer a quicker approach, this tool can help you achieve compliance.
Recommendations for Optimal Display
- Use a 1:1 aspect ratio (square format).
- Center your logo within the canvas.
- Use a non-transparent background to prevent display issues in different email clients.
Step 4: Purchase and Validate your VMC Certificate
Once your domain is DMARC-compliant and your trademarked logo is ready in the correct SVG format, the next step is to purchase your Verified Mark Certificate (VMC) from a trusted certificate authority. SSL2BUY is an authorized DigiCert partner offering DigiCert VMC Certificates at competitive pricing with end-to-end assistance throughout the validation process.
Once you initiate the purchase, DigiCert (the issuing Certificate Authority) begins a strict validation process to verify your organization and logo rights. This includes:
- Trademark Verification
DigiCert confirms that the logo submitted matches an officially registered trademark. - Organization Validation
Business’s legal existence and identity are verified through public records and official documents. - Identity Verification
Individual requesting the certificate is required to submit a notarized government-issued ID and complete a video or in-person verification call with the validation team.
Once all validation checks are completed successfully, DigiCert issues your Verified Mark Certificate, enabling your logo to appear in supported inboxes alongside your brand’s sender name.
Why Choose SSL2BUY?
- Official DigiCert partner with global reach
- Step-by-step guidance from purchase to final issuance
- Assistance with SVG logo compliance, DMARC verification, and documentation
- Competitive pricing + support from PKI experts
Step 5: Host Your VMC Certificate on a Public Server
Once your VMC is approved, the Certificate Authority will email you the entity certificate in PEM format. After uploading the PEM file to a publicly accessible HTTPS location, copy the exact URL. You’ll need it for the BIMI record.
Step 6: Prepare and Update Your BIMI DNS Record
To enable BIMI (Brand Indicators for Message Identification) for your domain, you will have to create and update a BIMI DNS TXT record. This record links your brand’s logo and VMC to your domain, ensuring your logo appears in supported email clients.
-
Create Your BIMI DNS TXT Record
A BIMI TXT record follows a specific format that includes URLs for your logo and VMC certificate:
v=BIMI1;l=https://yourdomain.com/path-to-logo.svg;a=https://yourdomain.com/path-to-certificate.pem
- l= (Logo): The direct URL of your Scalable Vector Graphics (SVG) format logo.
- a= (Authority): The URL of your PEM file (VMC certificate).
Note: Some email providers support BIMI with just an SVG logo (l=), but Gmail requires both the SVG logo and PEM certificate (a=) for proper display. -
Add the BIMI TXT Record to Your DNS
Log in to your domain provider’s DNS management panel and add the following values:
- Record Type: TXT
- Host: default._bimi.yourdomain.com
- Value: v=BIMI1;l=https://yourdomain.com/path-to-logo.svg;a=https://yourdomain.com/path-to-certificate.pem
- TTL: 1 hour (3600 seconds)
Step 7: Test and Monitor Your Setup
After setting up your BIMI record and uploading VMC certificate, it is recommended to test everything and monitor your domain’s authentication status.
Verify Your BIMI Setup
- Allow up to 48 hours for propagation.
- Use the BIMI lookup tools (Google Admin Toolbox, Valimail BIMI Checker) to confirm your record is correctly set up.
- Send a test email to check if your logo appears in the recipient’s inbox.
Monitor DMARC Reports
Check your DMARC reports at regular intervals so that SPF and DKIM alignment remains intact. If authentication fails, your logo might not appear in inboxes.
Conclusion: VMC Setup Is Strategic for Brand Trust
Implementing a Verified Mark Certificate isn’t just about ticking technical boxes. It’s a long-term investment in brand credibility, email security, and recipient trust. With DMARC enforcement and a trademarked logo, your brand stands out before the email is even opened and your customers know they’re dealing with the real you.
If you need help at any stage, whether it’s configuring DNS records, converting your logo, or navigating the validation process – our team at SSL2BUY is here to guide you.