If you have multiple servers connected to your main domain and all its subdomains (*.domain.com) then opting for a Wildcard SSL certificate to secure the websites can be a game changer. Many organizations prefer to use Wildcard SSL because it takes off the headache of managing multiple SSL certificates, saves time and minimizes the cost of buying and renewing each SSL certificate.
Wildcard SSL certificate is a versatile security solution that will automatically protect any new subdomain you create in future, ensuring domain-wide consistent security. In this blog, we’ll explain the process of installing a wildcard certificate on multiple servers in a few simple steps.
Steps to Install a Wildcard SSL Certificate on Multiple Servers
Step 1: Purchase Wildcard SSL Certificate
To get started, you must buy a Wildcard SSL certificate from a trusted Certificate Authority (CA) such as Sectigo, Comodo, DigiCert, RapidSSL, or GlobalSign. When choosing a CA, make sure they support Wildcard SSL and provide the necessary files to your servers.
After you have bought the Wildcard SSL certificate, your Certificate Authority (CA) will likely furnish you with guidance on generating a Certificate Signing Request (CSR). However, if those instructions are absent, feel free to follow the steps outlined below to create one yourself.
Step 2: Generate CSR for Wildcard Certificate
Once you have bought the Wildcard SSL, you will need to create a Certificate Signing Request (CSR). It’s important to initiate this process because CSR contains all the information to determine your domain, organization, location, etc. You can generate a CSR with these steps:
- Connect to the web server where your domain is hosted using SSH.
-
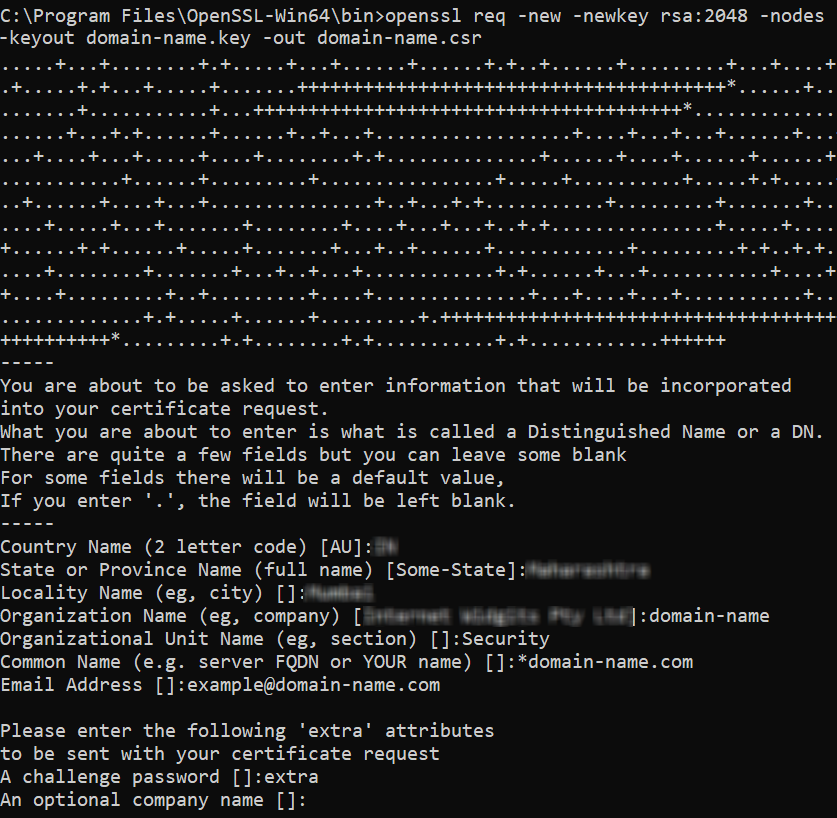
Use OpenSSL to generate the CSR.
openssl req -new -newkey rsa:2048 -nodes -keyout domain-name.key -out domain-name.csr
-
Once you execute the command, you will be prompted to enter few details like:
- Country Name (2-letter code): Enter your country’s abbreviation.
- State or Province Name: Enter your state name.
- Locality Name: Enter your city name.
- Organization Name: Your company’s name.
- Organizational Unit Name: Your department (e.g., IT or Security).
- Common Name: This will be your domain name and should be prefixed with a wildcard symbol, e.g. *.example.com to apply to all subdomains.
- Email Address: Enter your email address
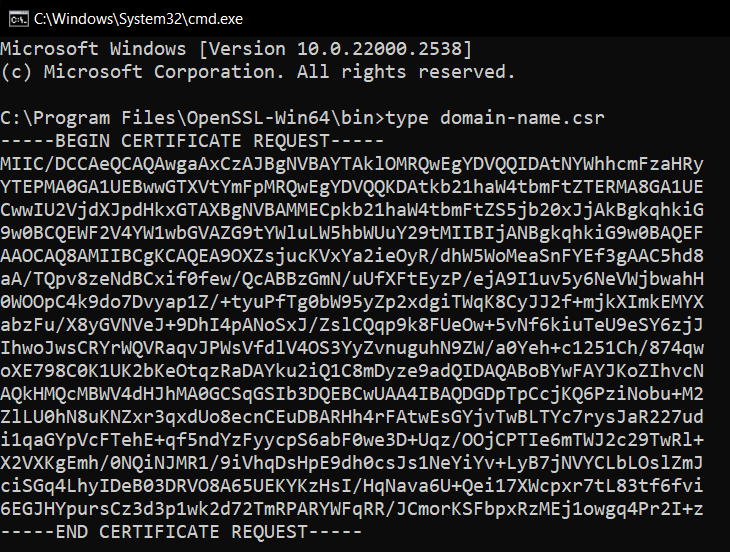
After generating the CSR, submit it to your CA for the certificate issuance process. Make
sure to copy the entire contents from the terminal window, including the
—–BEGIN CERTIFICATE REQUEST—– and —–END CERTIFICATE REQUEST—– parts.
Step 3: Complete certificate validation
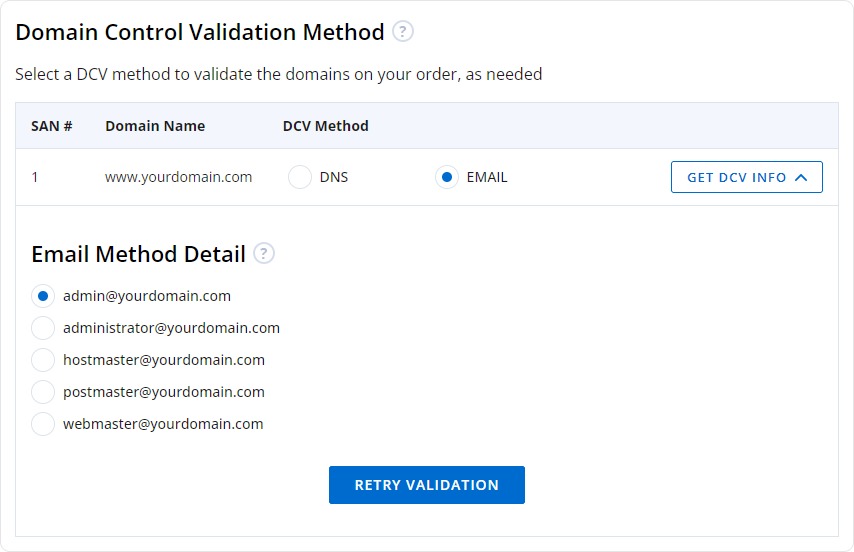
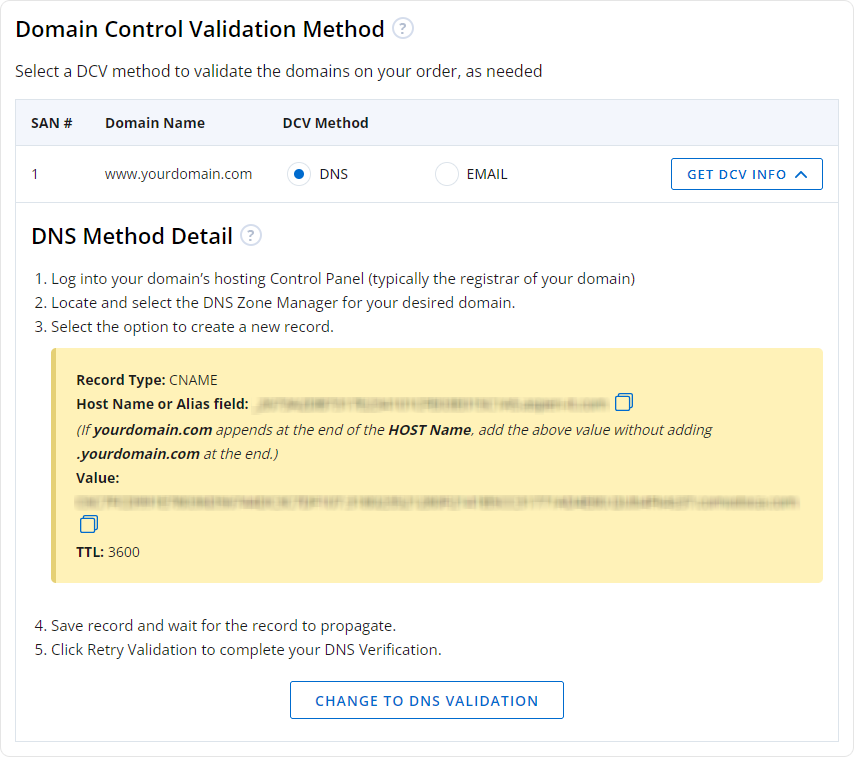
After you submit your CSR then your CA will request you to validate your domain ownership. This validation is done through different methods like
-
Email Verification: The CA will send DCV (Domain Control Validation) email to email addresses associated with your domain such as:
- admin@domain.com
- administrator@domain.com
- webmaster@domain.com
- hostmaster@domain.com
- postmaster@domain.com
This email is used to verify your ownership of the domain.
-
DNS Record Verification: The CA provides a DNS record which can be either a CNAME or a TXT record depending on the CA. This has to be added to your domain’s DNS settings which will help the CA to verify your ownership of the domain.
Step 4: Distribute Certificate Files to Servers
Now that your Wildcard SSL certificate is issued, you will receive several files from the CA:
- Certificate File (domain-name.crt): The primary certificate file.
- Intermediate Certificate (CA-bundle.crt): This file establishes the chain of trust between your server’s certificate and the CA.
- Private Key (domain-name.key): The private key you generated during the CSR process.
Now if you wish to install the certificate on multiple servers then you will need to generate a CSR from each server and install the certificate files accordingly.
If you were to have Server A and Server B and want to install the certificate file on both of them. To do this, you need to first generate a CSR on Server A and get the certificate files issued for it and then install it on Server A. Similarly, you need to generate a CSR on Server B, get the certificates issued and install it on the Server B. While you are transferring your certificate files from local system to each web server make sure to use secure file transfer such as scp (Secure Copy Protocol) or sftp (Secure File Transfer Protocol).
Step 5: Install the Wildcard SSL Certificate on Each Server
The installation process might slightly vary depending on your web server’s software (e.g., Apache, Nginx, IIS). But here’s a general installation guide for Apache and Nginx servers:
For Apache
- Move your certificate files domain-name.crt, domain-name.key, and CA-bundle.crt to the “/etc/pki/tls”
-
Also edit the Apache configuration file “conf” or “default-ssl.conf” and include these lines
SSLCertificateFile /etc/ssl/domain-name.crt
SSLCertificateKeyFile /etc/ssl/domain-name.key
SSLCertificateChainFile /etc/ssl/CA-bundle.crt
-
Restart your Apache
sudo systemctl restart apache2
For Nginx
-
Merge your domain-name.crt and CA-bundle.crt into one single file. This is to ensure a complete certificate chain is served by Nginx including server and intermediate certificates
cat domain-name.crt CA-bundle.crt > ssl-bundle.crt
- Move your ssl-bundle.crt and domain-name.key file to the “/etc/ssl” directory
-
Also edit the Nginx configuration file “conf” or the “server block” file and include these lines
server { listen 443 ssl; server_name domain-name.com *.domain-name.com; ssl_certificate /etc/nginx/ssl/ssl-bundle.crt; ssl_certificate_key /etc/nginx/ssl/domain-name.key; ssl_prefer_server_ciphers on; ssl_protocols TLSv1.2 TLSv1.3; } -
Restart your Nginx
sudo systemctl restart nginx
You can replicate the installation process for all of your servers hosting your subdomains. Make sure to validate if the certificate is properly installed on each server using SSL verification tools like SSL Installation Checker. These tools check for proper installation, which includes verifying that the certificate chain is complete and no errors are present.
Conclusion
By installing a Wildcard SSL certificate on multiple servers organizations can manage and secure multiple subdomains efficiently. Following the steps mentioned in this article such as purchasing the certificate, generating the CSR, completing domain validation, securely distributing certificate files, and installing the certificate on each server, you can ensure that your servers and subdomains are protected with robust encryption. A Wildcard SSL certificate not only simplifies management but also provides consistent and reliable security across your web infrastructure.
Related Posts:
- How to Install Wildcard SSL Certificate on NGINX Server
- How to Install an SSL/TLS Certificate in Apache Server
- How to Generate CSR and Install SSL Certificate on Microsoft Exchange Server 2019?
- How to Use an SSL certificate for WordPress Multisite Network?
- How to Enable an SSL Certificate on iPhone or iPad?


