Detailed guide to install intermediate and primary SSL certificate on Microsoft Exchange Server 2003
After generating the CSR, you are required to install SSL on Microsoft Exchange 2003. You have received a zip file in an email from SSL provider that you need to open and extract primary certificate and intermediate certificate. Now, copy and paste the content of both certificates including BEGIN CERTIFICATE and END CERTIFICATE tag in the text editor like notepad and save the file on the server.
Before installing the primary certificate (yourdomain.cer), you need to create a Certificate snap-in and install the intermediate certificate.
Create Certificate Snap-in:
- Click on Start button, type MMC (Microsoft Management Console) in Run window, and click OK button.
- Browse Menu > File > Add/Remove Snap-in and click Add tab
- Now, from the list of snap-ins, choose Certificates, Click Add button
- Select Computer Account and click Next button
- Choose Local computer and click Finish button
- From Snap-ins window, click Close
- From Add/Remove Snap-in window, click OK
Install Intermediate Certificate:
- On the left side, click Intermediate certificate Authorities folder
- Right-click Certificates
- Now, click on All Tasks > Import
- You will have certificate import window, click Next button
- Choose Intermediate CA certificate file and click Next tab
- Select Place all certificates in the following store and browse Intermediate Certification Authorities, Click OK
- Finally, Click Next, Click Finish and close the MMC.
Install SSL certificate on MS Exchange Server 2003:
After installing the intermediate certificate on MS Exchange 2003, you need to install the primary certificate on the server, which follows below procedure.
- Click on Administrative tools and Open IIS (Internet Information Service)
-
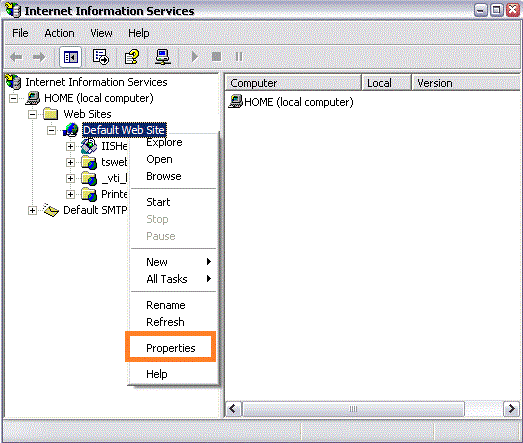
On the left side pane, browse IIS (Internet Information Service) > Home (Local computer) tab > Default websites and right click on Default websites and select “Properties”.
-
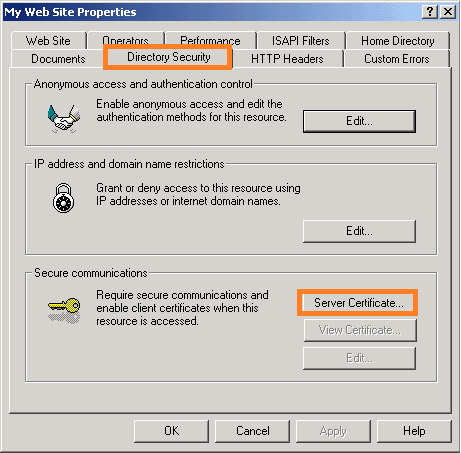
Now, click on Directory Security tab and click on Server certificate under secure communication section.
-
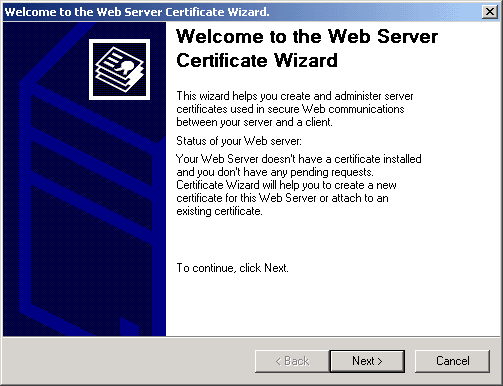
You will have Web server certificate wizard, click Next tab.
-
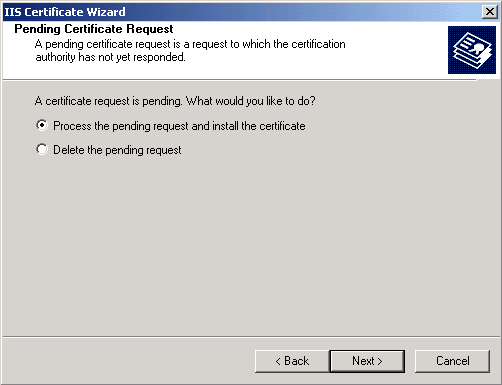
Select Process the Pending Request and Install the Certificate, click Next button.
- Browse the certificate file (yourdomain.cer) saved on the server and click Next.
- You will have certificate summary screen that you need to read carefully for further process, click Next tab.
- Complete the process with the click on Finish tab.
Assign SSL to Exchange Server 2003:
After installing process, you need to assign SSL certificate to exchange server for that you should follow few steps.
- Open IIS >>browse the website>>properties.
- Click on Directory Security tab and click Edit tab under secure communication section.
- In secure communication window, you need to check the box against Require Secure Channel (SSL).
- SSL is now assigned to Exchange server 2003 and the URL will start with HTTPS instead of HTTP for example https://www.yourdomain.com/exchange.
Finally, your SSL certificate is installed but you need to check the installed certificate on SSL2BUY’s installation checker. The installation checker will give you in-depth about certificate details like type of SSL, server, key size, issuer name and serial number, certificate issuer, etc.


