If you’re using Google App Engine to host your applications, securing user data should be a priority. Installing an SSL certificate is a crucial step in that process. SSL (Secure Socket Layer) certificates are a digital padlock for your website. They encrypt the information exchanged between your users and your site so that only the intended parties can access it.
In this guide, we’ll take you through the process of installing an SSL certificate on Google App Engine step by step. Whether you’re a developer looking to enhance security or someone curious about web safety, we’ll make it easy to understand and follow along.
What You’ll Need to Install SSL Certificate
Before you begin the installation process make sure that you have all the following components ready:
-
Your server certificate
This is the SSL certificate issued by a Certificate Authority (CA) for your domain. You should have received it via email or can download it from your account dashboard with your CA.
-
Your intermediate certificates
These certificates help browsers recognize the issuing CA. They may come bundled with your server certificate in a ZIP file, often labelled as a CA Bundle. If not, you can download them separately from your CA’s website.
-
Your private key
This key is necessary for SSL installation and should be kept securely on your server or with you if you’ve generated it with a CSR (Certificate Signing Request) tool.
How to Generate CSR on Google App Engine
To obtain an SSL certificate, you first need to generate a CSR which is simply an encoded text file containing information about your organization, domain, email, etc. This is used by your CA to verify your identity.
Here’s how to generate a CSR:
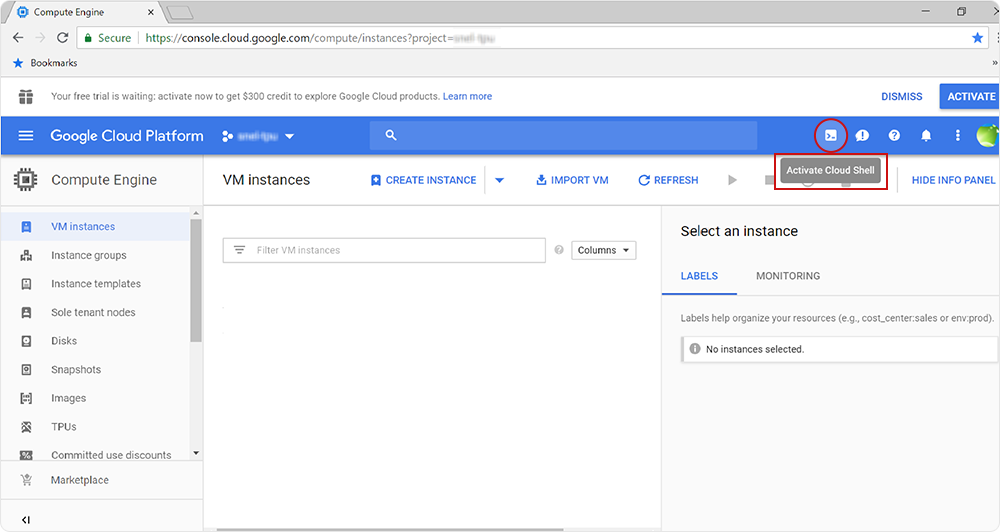
Step 1: Activate Google Cloud Shell
Open your Google Cloud Console and click on the Activate Google Cloud Shell button located at the top right of the page. This will open a command-line interface at the bottom of your screen.
Step 2: Run the CSR Generation Command
In the Cloud Shell, enter the following command to generate your CSR and private key
openssl req -new -newkey rsa:2048 -nodes -keyout yourdomain.key -out yourdomain.csr
Make sure to replace yourdomain with your actual domain name.
Step 3: Enter Your Information
You’ll be prompted to provide various details about your organization, and fill them accordingly to generate your CSR successfully.
Step 4: Complete the Process
After entering all required information press enter to save. The command will generate two files, your CSR (yourdomain.csr) and your private key (yourdomain.key).
Step 5: Submit to CA
Copy the content of your CSR file, including the —–BEGIN CERTIFICATE REQUEST—– and —–END CERTIFICATE REQUEST—– tags. Submit this to your CA to get your SSL certificate, but make sure to never share your private key with them.
How to Install an SSL Certificate on Google App Engine
Once you have all the necessary files like server certificate, intermediate certificates, and private key, follow these steps to install the SSL certificate on Google App Engine:
Step 1: Access Google Cloud Console
Log into your Google Cloud account
Step 2: Navigate to App Engine Settings
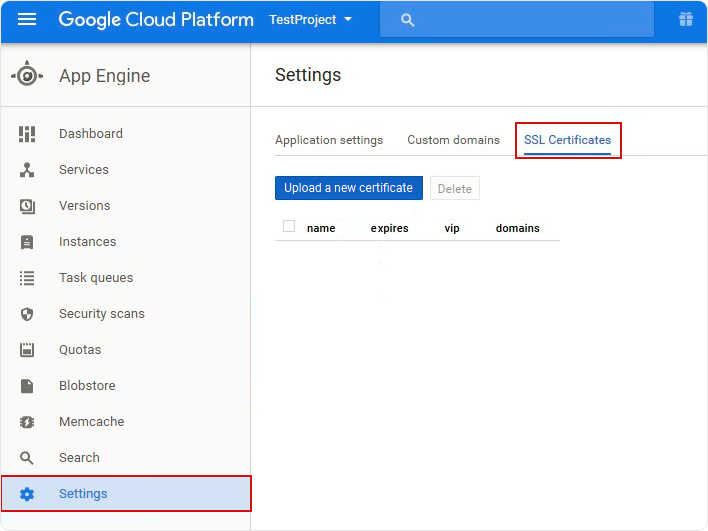
Access your app engine settings by going into “Products & Services” and selecting “App Engine.”
Step 3: Manage SSL Certificates
In the App Engine menu, click on “Settings,” then choose “SSL Certificates.”
Step 4: Upload your certificate
- Click on the “Upload a new certificate” button.
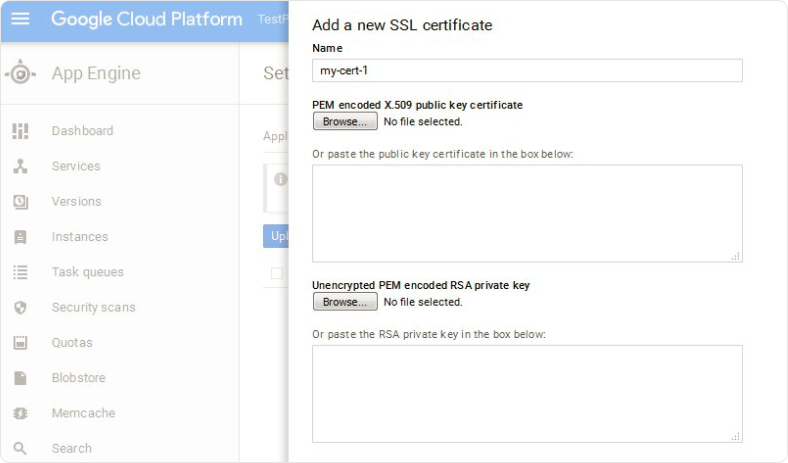
- In the dialog that appears, provide a name for easy identification.
- Paste the content of your SSL certificate in the PEM encoded X.509 public key certificate field.
- Next, paste the private key generated during the CSR process in the Unencrypted PEM encoded RSA private key field.
Step 5: Finalize installation
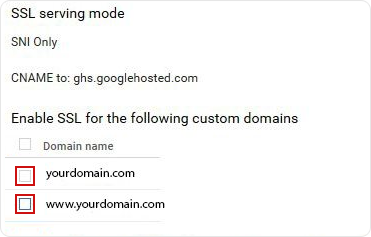
- After uploading, you will see an option to Enable SSL for the following custom domains.
- Select the domains you wish to secure and click “Save.”
Step 6: Verify installation
Use online tools like SSL Checker to confirm that your SSL certificate is correctly installed and functioning. Alternatively, you can visit your domain with the prefix https:// and look for a padlock/tune icon to confirm the installation of the SSL certificate.
Where to buy the best SSL certificate for Google App Engine?
When choosing an SSL certificate, it’s essential to focus on the validation type, price, certificate options, and reliable customer service. At SSL2BUY, we offer a comprehensive selection of low-price SSL certificates, backed by excellent customer support. We offer certificates from trusted Certificate Authorities and certificates that are compatible with major browsers.
Related Articles:


