Signing EXE Files with Code Signing Certificates Made Simple
Developers must take appropriate measures to keep the software and application packages from being tampered with by malicious hackers. One effective approach is to digitally sign the software or application using a code signing certificate.
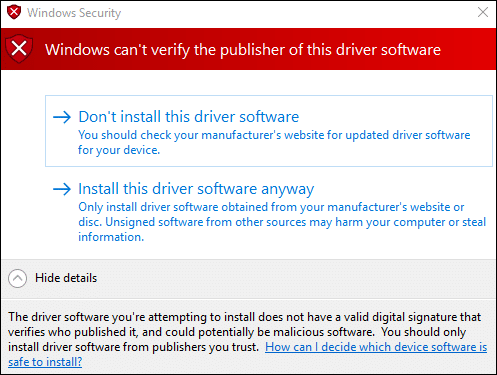
Code signing protects the developer’s reputation and credibility and even enhances the overall security of the software ecosystem. When a legitimate software publisher or developer does not digitally sign software, end users might receive warnings while downloading and installing such software on their device. It indicates the software they are trying to install might be coming from an untrusted source or potentially harmful.
This article covers all the necessary steps and requirements to sign an EXE file using a code signing certificate.
Requirement for Signing an EXE File
Before we start the process of signing the EXE file, it is crucial to look at some prerequisites to ensure a smooth signing process.
-
Buy a Code Signing Certificate
The first step in starting the code signing process is to actually buy a code signing certificate from a trusted Certificate Authority (CA). You can find a list of trusted CAs in the Microsoft documentation on code signing certificates (Click Here).
There are generally three types of code signing certificates that one can opt for:
-
Organization Validation – OV Code Signing Certificates: These certificates require verification of the organization’s identity before issuance. CA will conduct a thorough check of business registration details and confirm the organization’s legitimacy. OV code signing certificates provide a decent level of security. The reputation of the OV Certificate gradually improves with Microsoft’s reputation system over time.
Explore top-tier OV Code Signing Certificates from trusted Certificate Authorities now
-
Extended Validation – EV Code Signing Certificates: Software or application packages signed with EV code signing certificates display a higher degree of trust in operating systems like Windows due to the rigorous vetting process done by the CA. These certificates can be obtained by any software publisher that is a registered entity, company, or organization. Software signed with EV certificates minimizes the chances of getting flagged by security warnings and provides a smoother experience and greater confidence among users. You can refer this guide if you want to know which EV Code Signing Certificate is Best for your business.
Choose the Best EV Code Signing Certificates from Industry-Leading CAs
- Individual Code Signing Certificates: This type of code signing certificate is best suited for individuals or freelancers who build software that is not generally distributed on a large scale. Getting such certificates is easier than getting OV or EV code signing certificates, making it a quick option for those looking to digitally sign their software so that Windows does not flag it and can run smoothly.
When buying code signing certificates from a CA, consider factors such as the CA’s reputation, pricing, and after-purchase support.
Due to recent industry standards and norms, all the code signing certificates are stored and delivered to software publishers or developers in a secure hardware token such as HSM (Hardware Security Module), YubiKey, etc. However, DigiCert can host your certificate on the cloud for remote code signing.
-
-
Hardware and Software Requirements
Once you have successfully purchased the code signing certificate from a trusted CA, you need to fulfill some software and hardware requirements to sign your EXE file digitally.
- Secure Hardware Token: Keep your HSM / USB ready, which was sent to you by your CA during the issuance of the code signing certificate. This USB device contains the certificate that will be used to sign the EXE file. Make sure the HSM / USB complies with minimum standards such as FIPS 140-2 level 2 or Common Criteria EAL 4+ to maintain the integrity of your code signing process. For more information on these standards, check out the article What is FIPS 140-2- A Guide to Security Standards and Compliance.
-
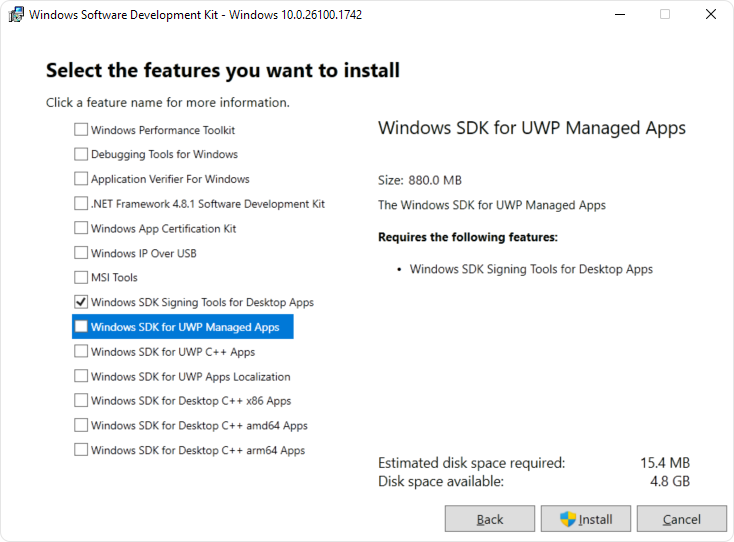
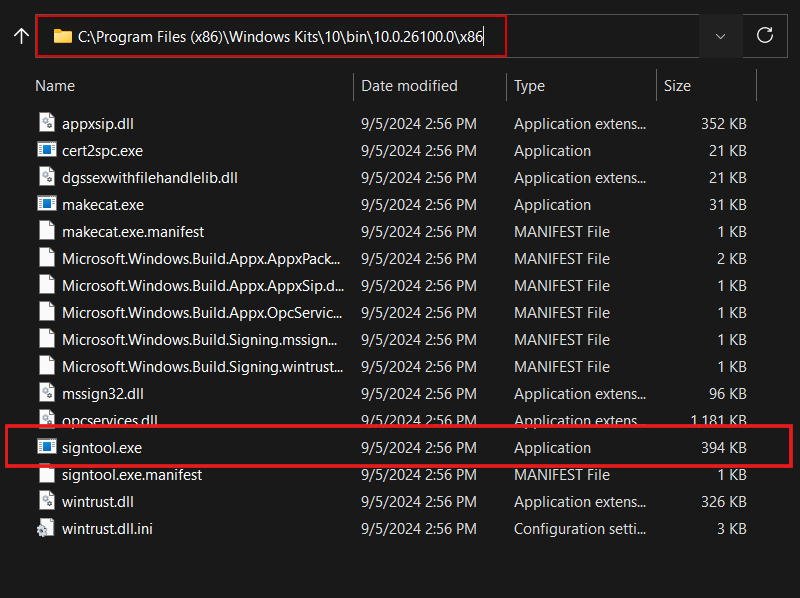
SignTool: SignTool is a Microsoft command line utility tool that is designed to facilitate the signing process and can be customized with different parameters. By default, SignTool is packaged with the Windows SDK (Download: Link). You must download and install SDK with only the “Windows SDK Signing Tools for Desktop Apps” feature. Once Installed, SignTool can be found at “C:\Program Files (x86)\Windows Kits\10\bin\10.0.26100.0\x86\signtool.exe”

- Internet Access: Ensure that you have a stable internet connection as this is vital during the signing process, especially when validating the certificate with the CA and timestamping your signatures.
-
Set Up the Secure Hardware Device
If you have opted for an HSM / USB token, you will also receive a manufacturer’s instruction to set up the hardware token for the first time. This usually involves two steps after you insert your HSM into your system.
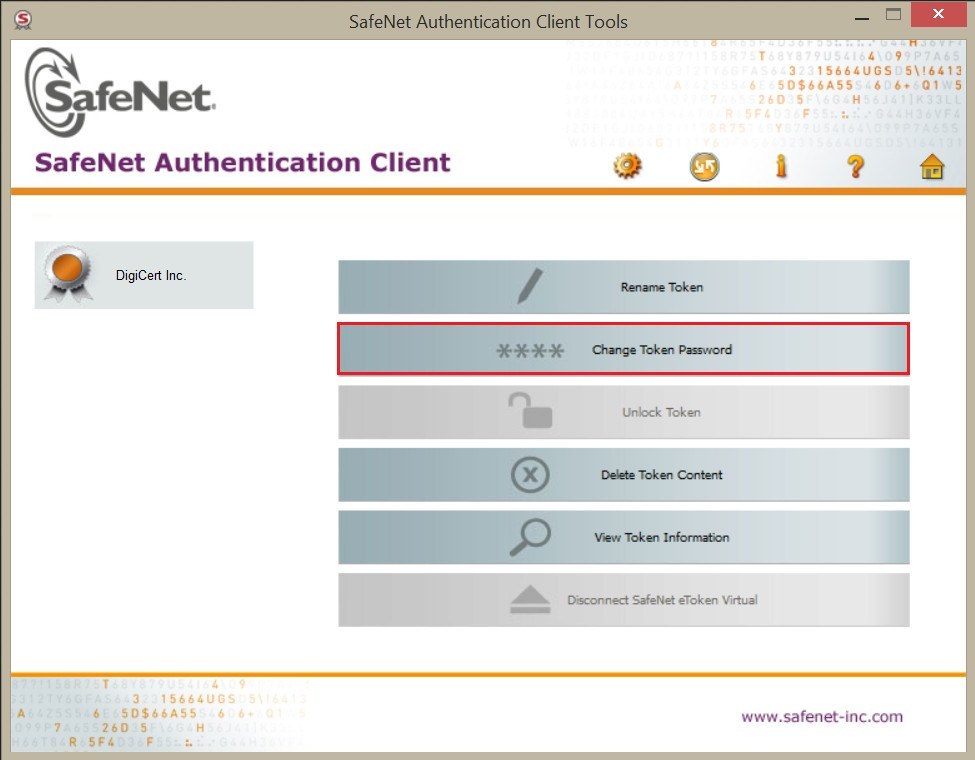
- Installing Authentication Software: Most HSM or USB token devices require authentication software such as SafeNet Authentication Client to interact with the hardware token. You need to download and install it as instructed by your CA, as this will be utilized to access and manage the certificate stored on your HSM or USB token.
-
Changing the Default Password: The hardware tokens usually come with a default password set by your CA, and it is essential to change this to a strong secure password.

Steps to Sign an EXE File Using Code Signing Certificate
Once the prerequisites are met, you can proceed with signing your EXE file.
-
Insert the HSM containing Code Signing Certificate
- Connect the HSM/ USB drive you received from CA to your Windows machine.
- Install any device driver if prompted by the USB drive.
-
Open CMD as Administrator
SignTool is a command-line utility, so it must be opened in the command prompt for the signing process. Make sure you run the command prompt as an Administrator to access system tools and resources without any interruption.

-
Locate the SignTool Utility
As mentioned earlier, SignTool is a part of Windows SDK and is typically located in the Windows Kits folder:
“C:\Program Files (x86)\Windows Kits\10\bin\10.0.26100.0\x86\signtool.exe”
-
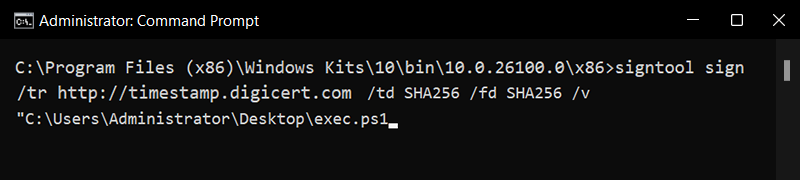
Run the SignTool Command
Use this command to sign your EXE file
signtool sign /tr http://CAtimestampserver.com /td SHA256 /fd SHA256 /v "path\to\yourfile.exe"
- /tr: This option specifies the URL for the timestamp server. SignTool makes a request to the supplied URL to obtain a timestamp for the signature, ensuring that the signature remains valid even if the certificate expires in future.
- /td: This option sets the hash digest algorithm for the timestamp which in this case is SHA256.
- /fd: This option sets the hash digest algorithm for the file which in this case is also SHA256.
- /v: Enables verbose output to show detailed information.
- Replace “path\to\yourfile.exe” with the path to your EXE file.
- Replace “http://CAtimestampserver.com” with the actual timestamp URL of your CA. This can be found on your CA’s website or manual.
-
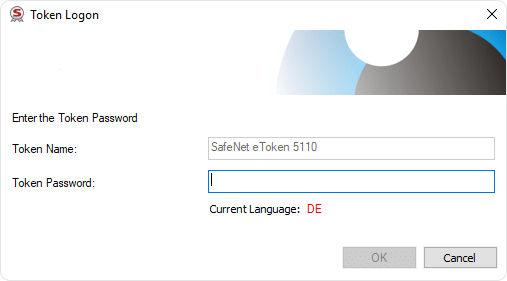
Enter the Password (if required)
As you hit enter with the above command, you might be prompted to enter the password for your authentication interface tool, whichever you must have set earlier. If you have set SafeNet as the authentication tool, then you need to enter the password for it accordingly.

-
Verify the Signing Process
After you enter the password, the signing process starts, and your console should show verbose output indicating that the file was signed successfully.


Verify Your EXE has been Signed Correctly
After successfully signing your EXE file using the above steps, it is important to verify that it was properly signed and that the signature is correctly applied with timestamps. We have multiple ways to verify this.
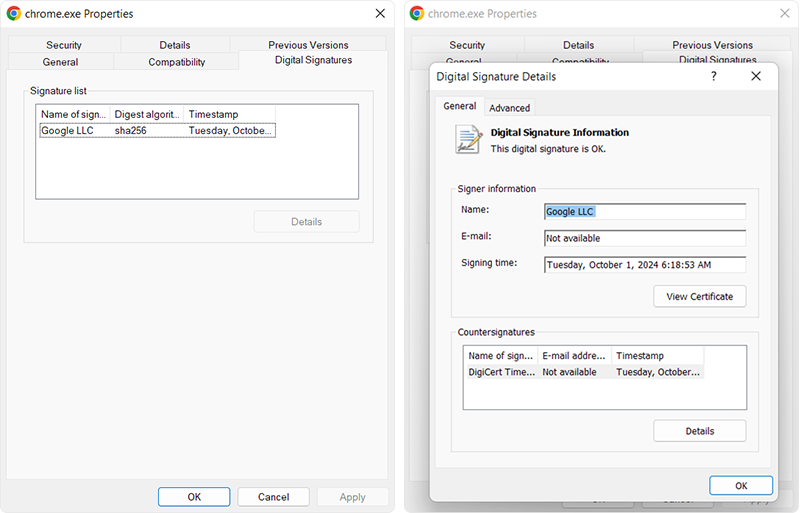
Check File Properties:
Visit the file path where your signed EXE file is stored
- Right-click on the EXE file
- Select the “Properties” option from the dropdown menu
- Go to the “Digital Signatures” tab.
If the EXE was successfully signed, you can see the signature with its timestamps and a message displaying “This digital signature is OK.”
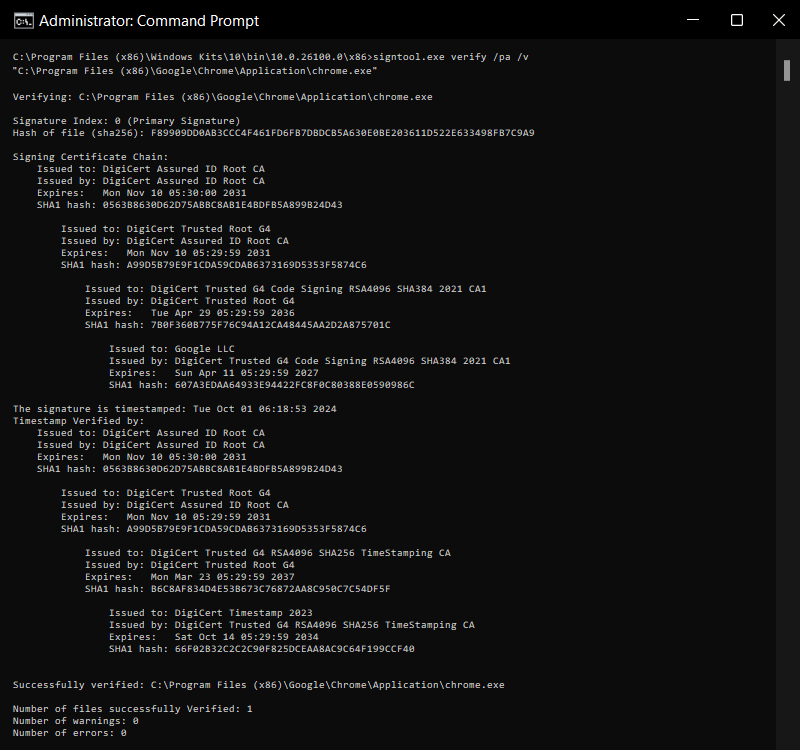
Verify using SignTool:
You can open your command prompt and use the SignTool itself to verify the signature of the EXE file you just signed.
signtool verify /pa /v "path\to\yourfile.exe"
Test on Another System:
It’s always a good practice to test the signed file on multiple systems. You can upload your signed EXE file to any file-sharing platform like Google Drive and then try to download it on another system and check if Windows flags the action with any kind of warning. If the file is successfully signed, Windows should recognize the file as coming from a trusted source.
Conclusion
Code signing is an important step in the software ecosystem, and by digitally signing an EXE file using a code signing certificate, developers and software publishers can assure their end users that the software or application package they are using is authentic and free from any malicious tampering. Code signing is not a difficult process, and following this step-by-step guide, any developer can digitally sign their software application package easily.
For those who are looking for cost-effective options, SSL2BUY offers discounts on various certificates as it’s an aggregator for code signing certificates and provides comparisons between different types of certificates.
Related Posts
