A website that utilizes HTTPS over Port 443 and is in use with SSL certificates is much safer than the HTTP over Port 80 protocol because data within HTTPS is encrypted while in transit across the Internet. The NGINX wildcard SSL certificate is just a file containing your site’s public key, identity, and other associated information. This is maintained on the site’s origin web server.
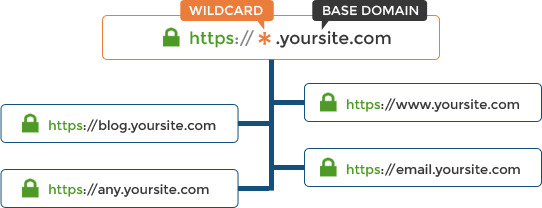
By default, SSL certificates will only cover the main domain, “example.com,” and not the subdomains unless you explicitly configure them. On the other hand, a wildcard SSL certificate offers a way to secure both the main domain “example.com” and all of its subdomains “*.example.com” with just one single SSL certificate. So, if you own the “example.com” domain, then A Wildcard SSL certificate will cover all of example.com, www.example.com, blog.example.com, mail.example.com, and so on.
This blog will guide you through the Wildcard SSL certificate installation process on NGINX server.
Step 1: Create CSR on NGINX Server for Wildcard Certificate
Before installing a Wildcard SSL certificate on NGINX server, a CSR (Certificate Signing Request) must be generated. This CSR will contain all the necessary information that is needed to identify your domain, organization, location, etc. Later on, this CSR is then submitted to a trusted Certificate Authority (CA) for issuing the SSL certificate.
Steps for generating a CSR on NGINX server:
-
Access the Nginx Server
First of all, login to your Nginx server using any SSH client, like PuTTY
-
Navigate to SSL Directory
It’s usually a good practice to store SSL-related files in a specific directory. You can use the command given below to change the directory.
cd /etc/nginx/ssl
-
Generate CSR & Private Key
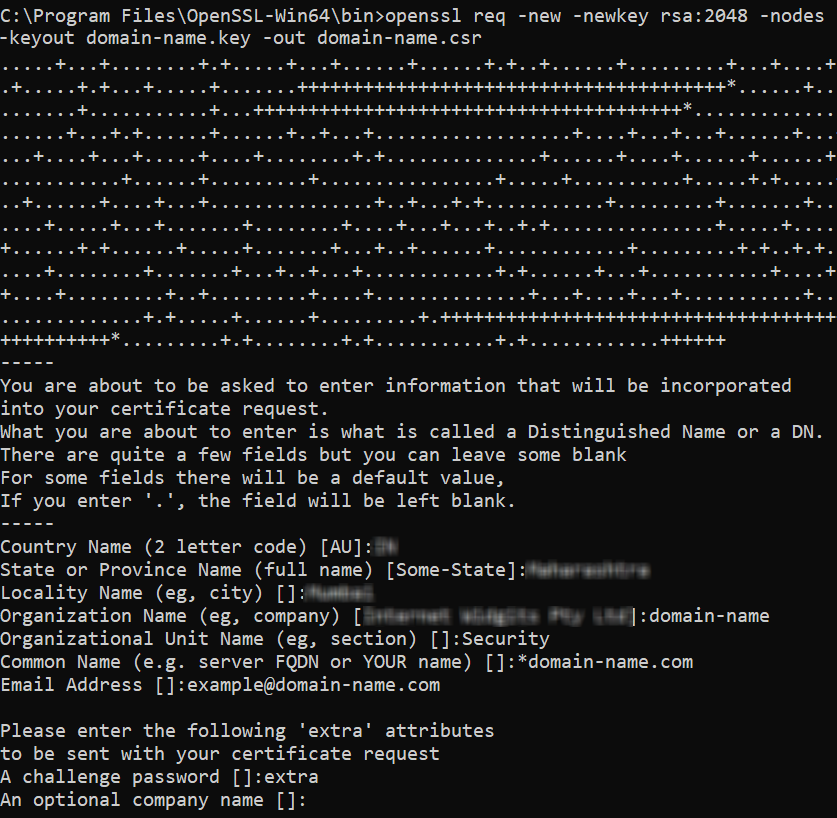
Execute the following command to generate CSR & private key.
openssl req –new –newkey rsa:2048 –nodes –keyout domain-name.key –out domain-name.csr
You need to change the “domain-name” in the command using your own domain name.
Click enter, then you have to enter a few details, such as:
- Country Name (2-letter code): Enter your country’s abbreviation.
- State or Province Name: Enter your state name.
- Locality Name: Enter your city name.
- Organization Name: Your company’s name.
- Organizational Unit Name: Your department (e.g., IT or Security).
- Common Name: This will be your domain name and should be prefixed with a wildcard symbol, g. *.example.com to apply to all subdomains.
- Email Address: Enter your email address

-
Locating the CSR and Private Key
After everything is finished, the Certificate Signing Request (CSR) and Private Key are saved in the user’s directory, or our example, “/etc/nginx/ssl.”
cat /etc/nginx/ssl/domain-name.csr
Copy the entire contents from the terminal window making sure that you include the —–BEGIN CERTIFICATE REQUEST—– and —–END CERTIFICATE REQUEST—– parts.
-
Submit the CSR to a Certificate Authority (CA)
You need to use the generated CSR (domain-name.csr) to purchase Wildcard SSL certificate from a trusted Certificate Authority (CA) like Comodo, DigiCert, Sectigo, GeoTrust, RapidSSL, AlphaSSL, GlobalSign, etc.
Step 2: Install Wildcard SSL Certificate on Nginx Server
-
Combine Primary and Intermediate Certificate Files
Merge the primary SSL certificate (domain_com.crt) and intermediate CA bundle (domain_com.ca-bundle) into a single file. This combined file ensures Nginx serves the complete certificate chain, which includes both the server and intermediate certificates.
If you’re using the command line, run the following command:
cat domain_com.crt domain_com.ca-bundle > ssl-bundle.crt
Alternatively, if you’re using a text editor (such as Notepad):
- Open both domain_com.crt and domain_com.ca-bundle in your text editor.
- Copy the entire content of the domain_com.crt file.
- Paste it at the top of the domain_com.ca-bundle file.
- Save the combined file as ssl-bundle.crt.
-
Store the Combined Certificate and Private Key in Nginx SSL Directory
Next, move the combined SSL bundle (ssl-bundle.crt) and private key (example_com.key) to the appropriate Nginx SSL folder.
-
Create the directory for SSL files:
mkdir -p /etc/nginx/ssl/example_com/
-
Move the bundle to the directory:
mv ssl-bundle.crt /etc/nginx/ssl/example_com/
-
Move the private key to the directory:
mv example_com.key /etc/nginx/ssl/example_com/
-
Ensure that the permissions for the private key file are set to secure access:
sudo chmod 600 /etc/nginx/ssl/example_com/example_com.key
-
-
Modify the Nginx Configuration File
Now, you need to configure Nginx to use the combined certificate and the private key. Open the configuration file associated with your domain (commonly found in /etc/nginx/sites-available/):
sudo nano /etc/nginx/sites-available/example_com
Edit the server block to include the SSL certificate and private key:
server {
    listen 443 ssl;
    server_name example.com *.example.com;

    ssl_certificate /etc/nginx/ssl/example_com/ssl-bundle.crt;
    ssl_certificate_key /etc/nginx/ssl/example_com/example_com.key;

    ssl_prefer_server_ciphers on;
    ssl_protocols TLSv1.2 TLSv1.3;
}
Note: For wildcard certificate, ensure that each domain or subdomain in the certificate is properly configured in the corresponding server blocks of your configuration file. -
Enable OCSP Stapling (Optional but Recommended)
To improve SSL handshake performance, enable OCSP Stapling, which allows Nginx to provide certificate revocation status without the client having to contact the Certificate Authority (CA) directly.
Add the following directives to your server block:
## OCSP Stapling
resolver 127.0.0.1;
ssl_stapling on;
ssl_stapling_verify on;
ssl_trusted_certificate /etc/nginx/ssl/example_com/ca-bundle.crt;
- ssl_stapling on; enables OCSP stapling.
- ssl_stapling_verify on; ensures that Nginx verifies the OCSP responses.
- ssl_trusted_certificate should point to the CA bundle, which contains the necessary intermediate and root certificates.
- resolver specifies the DNS resolvers that Nginx will use to fetch OCSP responses.
Note: For OCSP stapling to work correctly, all necessary intermediate and root certificates must be present in the ca-bundle.crt. -
Test the Configuration
After modifying the configuration, it’s important to test it to ensure everything is working properly.
sudo nginx -t
If the configuration is valid, you will see a message like:
nginx: configuration file /etc/nginx/nginx.conf test is successful
-
Restart Nginx
Once the configuration passes the test, restart Nginx to apply the changes:
sudo systemctl restart nginx
Step 3: Verify Your SSL Certificate
After installing the Wildcard SSL certificate, it’s crucial to verify that it’s working correctly.
Methods to Verify:
-
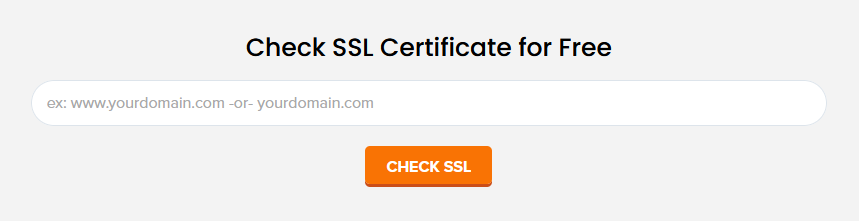
Using Online SSL Checker
Websites like “SSL2BUY” offer free tools to check the status of your SSL certificate. Enter your domain name, and the tool will generate a detailed report on your SSL installation.
Access our tool: https://www.ssl2buy.com/wiki/ssl-installation-checker

-
Verifying using Browser
Try visiting the website using https:// as a prefix in your browser. Try to look for a lock icon near the address URL confirming that the SSL is enabled

-
Checking with Command Line
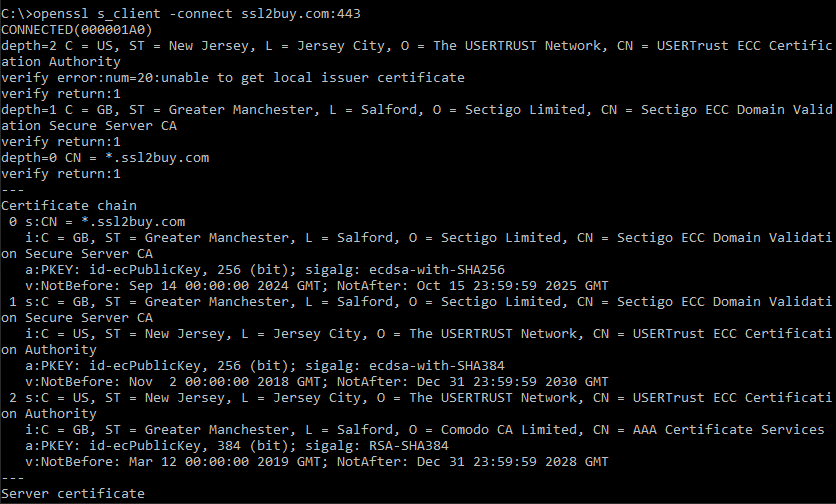
OpenSSL can be used from the command line to verify the certificate.
openssl s_client -connect domain-name.com:443
You can use the above command to get the SSL certificate details like the expiration date, the chaining of intermediate certificates along with other important details.


Final Thoughts
Installing a Wildcard SSL certificate on the Nginx server ensures that the primary domain and all its associated subdomains are protected with robust encryption. Suppose you are self-hosting the Nginx server and want to install a Wildcard SSL certificate on your server. In that case, you first need to generate a CSR and install the Wildcard SSL certificate after it is purchased from a reputed CA. Once installed on your server, you can easily verify the installation using the steps mentioned in this guide. This process helps maintain secure communication between your server and users, enhancing trust and credibility.
Related Posts
