Android devices are widely used mobile operating systems, it is extremely important to secure them against rising cyber threats. Implementing SSL certificates on your device is a key step to protect against potential risks. The process begins with creating CSR (Certificate Signing Request), a fundamental requirement for SSL certificate installation.
SSL (Secure Socket Layer) certificate installation on Android facilitates secure communication by validating HTTPS connections. While the core process is similar across devices, variations may occur based on your manufacturer and OS version.
We’ll start by installing a Trusted Root Certificate Authority SSL certificate on an individual Android device. Whether you are familiar with the process or new to it, this guide breaks down each step clearly, making the complex process easy to follow.
Prerequisites for Installing an SSL Certificate on Android
Once Certificate Authority (CA) validates and issues your SSL/TLS certificate, make sure you verify all SSL files align with the specific requirements of your Android device.
Below are the 5 checklists that you should go through before you install an SSL certificate on Android.
-
SSL Certificate File Format Compatibility
Android supports a DER-encoded X.509 SSL certificate. Therefore, make sure your certificate is in this file format, such as .crt, .cer, or .pem.
-
Compatibility of Key Store Files
Android is compatible with PKCS#12 key store files with extensions .p12 or .pfx. Make sure your SSL certificate is stored using this format.
-
Create Password
Before installing an SSL certificate on Android, verify that you’ve generated a PKCS#12 password. It’s crucial for the security of your SSL certificate.
-
Convert Non-Compatible SSL Certificate File Extensions
In case your SSL certificate isn’t in an extension file format of .crt or .cer, you’ll be required to convert it using an SSL converter tool to make it compatible with your Android device. You can learn more about the difference between CER and CRT.
-
Universally Compatible
Android supports various SSL versions, whether old or new. Hence, stay assured your SSL certificate will integrate with your Android device without any issues.
How to Install SSL Certificate on Android – Step-by-Step Instructions
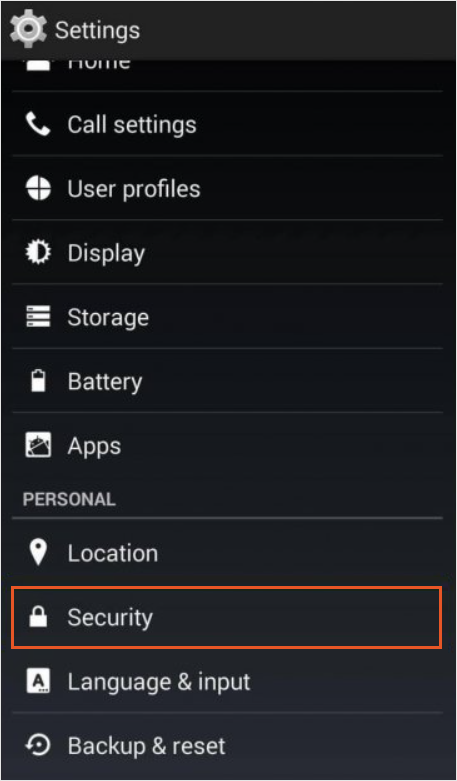
Step 1 – Go to Settings
Open the Settings app on your Android device. Go to the admin dashboard on your Android device. Further, navigate to Settings > Security (the exact location may vary by device).
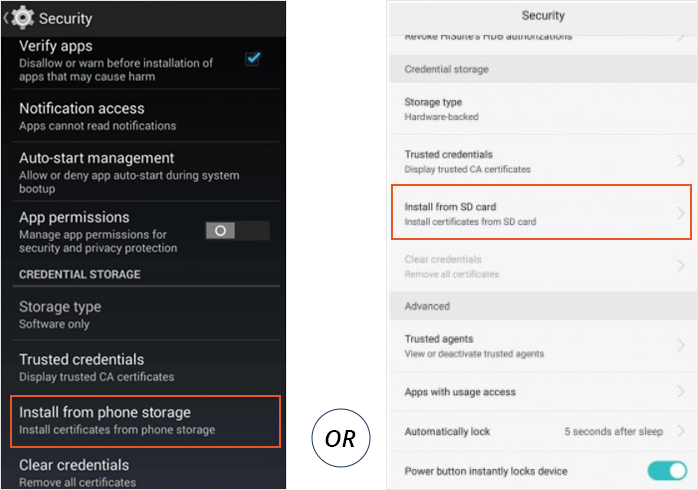
Step 2 – Start Installation
In the Security settings, find and tap on Credential Storage; from there, locate the Install from Phone Storage or Install from SD Card option.
If you can’t see these options, you may have to go to Advanced Settings and, within that, Security or Privacy.
Step 3 – Select File
Once you select an option to install, you’ll be encountered with the File Storage Manager. Locate and select the SSL certificate file that you have on your Android device.
Step 4 – Validation
You may be prompted, and you may be required to provide the PKCS#12 passphrase or password you generated. This is a verification process to confirm your identity and authorize the installation of the SSL certificate, which is part of the validation Process.
Step 5 – Name the Certificate
Within the Certificate Name field, assign easy to remember name that helps in quickly finding the certificate.
Step 6 – Using Credentials
Based on the requirement of security, select the right Credential Use. Similarly, select the equivalent one for utilizing the SSL certificate for applications, Wi-Fi, or VPN.
By completing above mentioned steps, you’ve successfully installed an SSL certificate on your Android device. Now, your online activities are secured with an added layer of SSL security, providing safety for sensitive information and interactions.
How to Improve SSL Security on Samsung, OnePlus & Pixel Devices
Enhancing the security on your Pixel, OnePlus, or Samsung device isn’t tricky. Here’s an on-point guide on how you can integrate an SSL certificate to achieve online safety.
For Pixel & OnePlus Device
Step 1 – SSL Certificate Download
Download the SSL certificate (e.g., “certificate_name.crt”) onto your device.
Step 2 – Start Installation
- Go to Settings > Network & Internet > Wi-Fi.
- Go to Wi-Fi Preferences and tap on Advanced.
- In this menu, find and select Install Certificates.
Step 3 – Integration of SSL Certificate
- Select the downloaded SSL certificate that you did in Step 1.
- Now, you’ll be routed to a screen where you’ll be asked to name the certificate. Simply assign an easy-to-remember name and press OK.
Step 4 – Verify SSL Installation
Verify that you’ve installed the SSL certificate successfully on your Android device, Pixel or OnePlus, by using the below steps:
-
Go to Settings >> Security.
-
In that, select Trusted Credentials.
- Now, locate and confirm the SSL certificate under the User section.
For Samsung Devices
Step 1 – Downloading SSL Certificate
Download the required SSL certificate onto your Samsung device.
Step 2 – Configuring Device
- Go to the Settings of your Samsung device.
- Go to Biometrics and Security.
- Within that, select Other Security Settings.
Step 3 – Install SSL Certificate
- Select Install from Device Storage.
- Further, tap on CA Certificate.
- Tap on Install Anyway and confirm your intent.
- Download the SSL certificate by tapping on Download.
- Follow the on-screen instructions to complete the installation process.
Troubleshoot Common SSL Certificate Installation Issues
-
Incorrect Certificate Path
It usually occurs when an Android device fails to validate your SSL certificate chain at the time of attempting a secure SSL connection. It’s an issue related to the hierarchy of SSL certificates, and it’s encountered mostly at the time of installation or usage of an SSL/TLS certificate.
Some of the common reasons why users face this issue are:
- Intermediate certificates are missing
- Untrusted Root CA
- Revoked or Expired SSL certificate
- The server is not configured properly
- Issues related to the format of the SSL certificate
- Android OS is outdated
- Interference of Proxy or Network
Below are the quick fixes for this SSL certificate installation-related issue:
- Verify the SSL certificate chain.
- Install the missing intermediate certificate.
- Update your root certificates.
- Verify whether the SSL certificate is expired or revoked.
- Make proper server configuration.
- Update your Android OS to the latest version.
- Use a browser or application that fully supports an SSL certificate.
- Clear cache files and restart the Android device.
- Verify if there’s any proxy issue and resolve it.
-
Validation Errors
Validation errors at the time of installing an SSL certificate on an Android device usually arise whenever the device fails to recognize or validate the SSL certificate properly. Such SSL errors often involve configuration issues, compatibility issues, or missing components of the SSL certificate. Similarly, 5 common types of validation errors are:
- Certificate hostname mismatch
- Expired certificate
- Certificate not trusted
- Unsupported certificate
- Incomplete certificate chain
Some common causes that users face these validation errors are:
- The certificate chain is incorrect.
- Root CA is not in the trusted root certificate store of Android.
- The common name (CN) or Subject Alternative Name (SAN) doesn’t match with the accessed domain.
- SSL certificate or one of the certificates within the chain is revoked or expired.
- Your SSL certificate is using an unsupported or outdated hashing algorithm like SHA-1.
- SSL certificate isn’t installed using the correct format or correct location of Android device.
- Android version is older and may not support modern standards of SSL certificates.
- A firewall or proxy might be modifying SSL traffic that causes validation failures.
- The date & time of the Android device is not correct.
Below are quick fixes related to the Validation Error:
- Verify whether the SSL certificate chain is correct. Check that the SSL certificates are installed with all its intermediate certificates.
- Avoid self-signed SSL certificates and use a trusted Root CA issued by a globally known CA (Certificate Authority).
- Confirm domain or subdomain matches the Common Name or it’s listed within the SAN. Similarly, replace the certificate if there’s any mismatch.
- Check whether it’s revoked or expired and get a trusted SSL certificate.
- Make sure your SSL certificate supports modern encryption standards like SHA 256. Similarly, avoid deprecated algorithms like SHA-1 and 1024-bit RSA keys.
- Use the correct location on your Android device, and make sure you’re using the correct file format, like .p12 or .pfx, for installing on Android.
- Update your device with the latest Android operating system version.
- Check date & time on your device is correct.
- Check if there’s any disturbance from the Network. For example, disable proxies, firewalls, or VPNs. Make sure networks aren’t using man-in-the-middle certificates.
-
Connectivity Problems
A “Connectivity Problem” error at the time of installing an SSL certificate on an Android device usually comes with issues related to certificate validation or network communication. It occurs because of improper configuration of the server, network interference, or device settings.
Here below are some commonly seen causes due to which “Connectivity Problems” error is faced at the time of installing an SSL certificate on Android.
- Android device isn’t connected properly with the internet or network connectivity is unstable or weak.
- SSL certificate isn’t installed or configured on the server correctly, leading to failed connection/s.
- The intermediate certificate is missing, disrupting the certificate chain.
- The DNS issue is preventing it from reaching the server.
- The server is imposing an older protocol version, which is not supported by users Android device.
- SSL certificate or one within the chain is revoked or expired.
- Your Android device doesn’t have support for the newer trusted root certificates or SSL standards.
Let’s look at how to troubleshoot these Connectivity Problems.
- Check your internet connectivity. Make sure your Android device is connected to a steady network like mobile data or Wi-Fi.
- If a VPN or proxy is active, disable it on a temporary basis to check issue is caused by the VPN.
- Make sure you’ve installed the SSL certificate on your Android device correctly, including all intermediate certificates.
- Clear the cache file and restart your Android device.
- Update Android device to latest supported version.
- Verify the validity of the certificate and make sure it’s not expired or revoked.
- Match the issued SSL certificate with the domain name. Similarly, if you find any mismatch, then correct it accordingly.
- Verify that the server supports a compatible TLS version (e.g., TLS 1.2 or 1.3).
- Reinstall SSL certificate.
Conclusion
In today’s world, where mobile devices – especially Android devices- are used for most activities, protecting user privacy and building trust is a must. An SSL certificate plays an important role in securing and encrypting communication between Android applications and servers.
Nonetheless, if you’re looking to install SSL but have questions such as how to install SSL certificate on Android device, we’ve covered step-by-step instructions in this comprehensive guide. Similarly, we’ve also covered what are some of the common errors you can face and how to troubleshoot them. Follow these steps to achieve seamless SSL installation and enhanced security for your Android device.

