If your website doesn’t have SSL/TLS certificate, browsers will label it as “Not Secure”, warning users about potential risks. These warnings can drive visitors away and harm the site’s reputation. SSL (Secure Socket Layer) encrypts data exchanged between servers and users and removes security warnings.
In this guide, we will walk you through the steps to install an SSL certificate on HostGator, making it simple and straightforward even if you’re a beginner!
Steps to Install the SSL Certificate in HostGator
You can follow the steps mentioned below to generate and install an SSL certificate in HostGator.
Step 1: Choose an SSL Certificate
When securing your HostGator platform, you have options for purchasing an SSL certificate:
-
SSL Certificates from SSL2BUY
At SSL2BUY, we provide SSL certificates, starting at just $5.99 per year. This affordable option provides encryption for your website while maintaining compatibility with HostGator and other hosting platforms.
-
SSL Certificates from HostGator
HostGator offers SSL certificates directly through their platform. Pricing starts at $19.99 for the first year, with renewals priced at $39.99 per year. These certificates are designed to work seamlessly with their hosting services, offering a smooth integration process.
Step 2: Generate a Certificate Signing Request (CSR)
After selecting your SSL certificate, it’s time to create a Certificate Signing Request (CSR). This request contains information about your website, which is needed by the Certificate Authority (CA) to issue your SSL certificate.
Here’s how to generate a CSR in HostGator:
- Log into your HostGator cPanel.
-
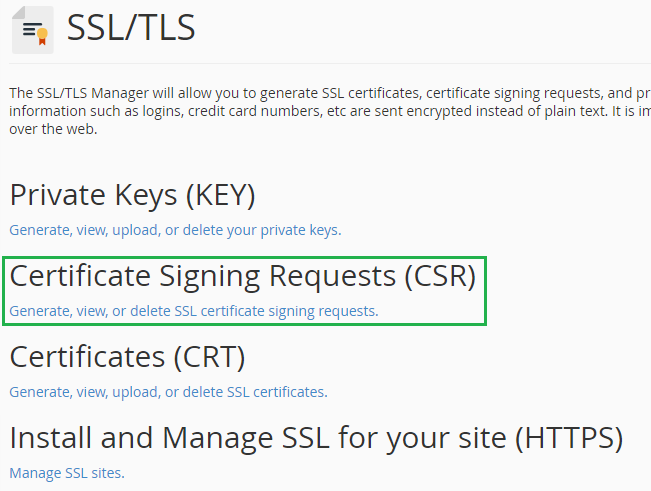
Find the Security section and click on SSL/TLS.
-
Select Generate, view, or delete SSL certificate signing requests.
-
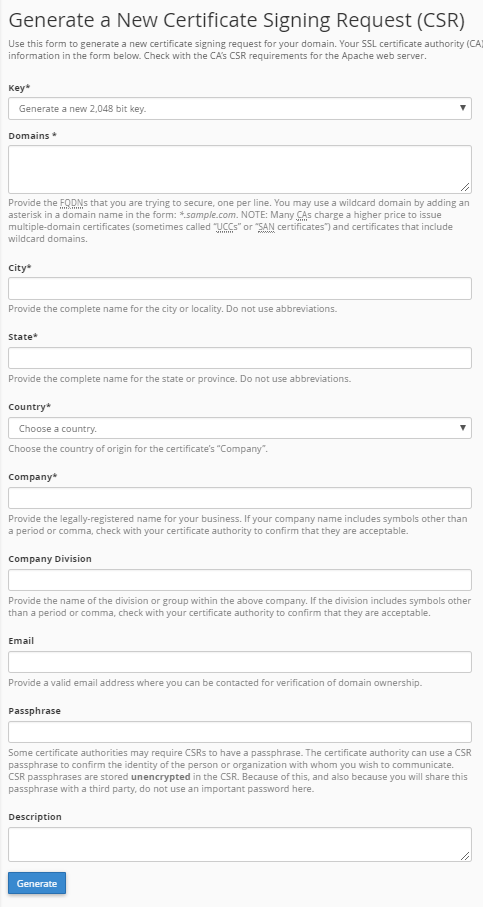
Fill out the required fields with accurate information and make sure it matches what’s in your domain’s WHOIS records.
Once you fill out the form and click on Generate, you’ll receive both a public key (the CSR code) and a private key (the RSA key).
Step 3: Managing Public and Private Keys
After generating the CSR, you’ll have two keys:
-
Public Key
It can be shared with anyone and is included in your CSR sent to the CA.
-
Private Key
This must remain confidential and should never be shared. If someone gets access to it, they can compromise your SSL certificate.
Make sure to store your private key securely, perhaps in a password-protected document or a secure password manager.
Step 4: Provide the CSR Code to the Certificate Authority
Now that you have your CSR ready, it’s time to submit it to the CA from which you purchased your SSL certificate. This step is important as it allows them to create your actual SSL certificate. Do not send your private key to the CA – only provide the CSR code.
Step 5: Complete the Validation Process
After submitting your CSR, the Certificate Authority will reach out with instructions on how to validate your request. Depending on the type of SSL certificate you chose, this process may vary:
-
Domain Validation (DV)
You just need to click a link sent to an email associated with your domain.
-
Organization Validation (OV) or Extended Validation (EV)
It requires more thorough checks and may ask for additional documentation.
Follow their instructions carefully to avoid delays or errors during certificate issuance! You can refer to the guide to understand more about the validation process and its types.
Step 6: Save the SSL Certificate
Once validation is complete, you’ll receive an email from the CA containing your SSL certificate along with any necessary intermediate certificates (often called a CA bundle). You should expect two main files:
- CRT File: This is your actual SSL certificate.
- CA Bundle: This contains root and intermediate certificates.
Open these files in a text editor and copy their contents; you’ll need them for installation.
Step 7: Request for HostGator to Install the SSL Certificate
Now comes the final part to install your SSL certificate on HostGator, follow these steps:
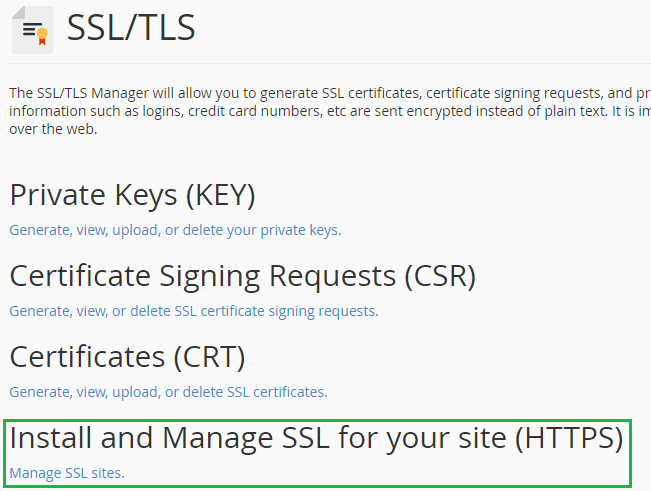
- Go back to your cPanel and navigate to SSL/TLS.
-
Click on Manage SSL sites.
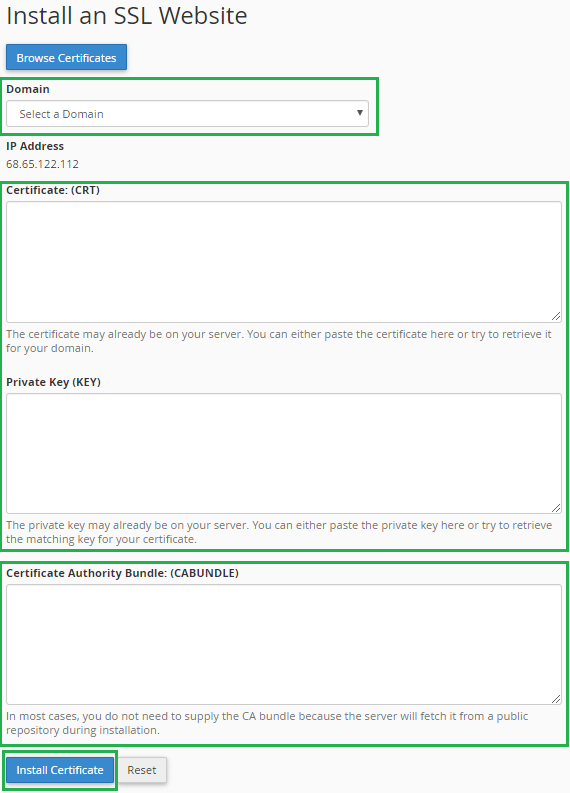
- Fill out the installation request form:
- Choose the Domain for which you want to install the SSL certificate.
- Paste the CRT file content into the Certificate field.
- Paste your private key into Private Key field.
- Paste the CA bundle content into the Certificate Authority Bundle field.
- Submit this form and wait for confirmation from HostGator that everything has been installed successfully.
If you’re using a shared hosting, you cannot install an SSL certificate on your own, HostGator needs to handle that for you. You have more flexibility if you’re a VPS or dedicated server user, and you can install certificates directly or have HostGator help you.
If you are asking for assistance from HostGator keep in mind that there are fees for the installation of third-party certificates.
Conclusion
Installing an SSL certificate on HostGator involves several straightforward steps like how to select the right certificate, creating a CSR, validation processes and the ability to install the SSL certificate on the HostGator’s interface. If you follow this guide carefully, even if you are new to web hosting you can easily secure the website with an SSL certificate.
It’s important to remember that website security doesn’t just end with installing an SSL, you also have updates and monitoring to do in order to protect your site constantly.
Related Post


