Securing a Heroku app using SSL certificate encryption is essential for securing user’s critical data and preventing vulnerabilities. SSL certificates encrypt communication between clients and the Heroku server, so no third party can intercept or read it. However, if you don’t know how to install an SSL certificate on Heroku Server, this guide will walk you through the process step by step.
But before you begin installing an SSL certificate you need to make sure to buy SSL certificate. Also, you’ll need to generate a CSR to have the SSL certificate validated for the website you want to secure.
Prerequisites and First Steps: Generate CSR & Private Key
No matter what server you’re using, to install SSL certificate the first step is to generate CSR & Private key. For Heroku servers, the process is no different. CSR (Certificate Signing Request) is a file that includes crucial details of your domain and organization, which is verified by the CA (Certificate Authority) to validate and issue the SSL for which you applied.
Steps to Generate and Use the CSR
-
Generate the CSR
Use your server tools to generate the CSR and private key. Save the private key securely, as you’ll need it later during installation.
-
Access the CSR File
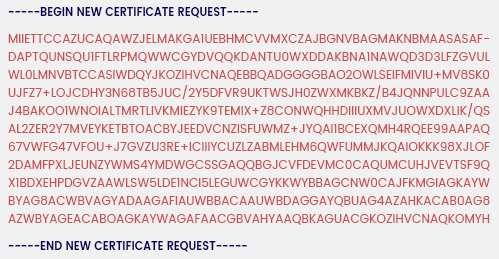
Once the CSR is generated, your next step will be to access the .csr file using a text editor like Notepad. Copy the complete text given in the CSR along with the tags —-BEGIN NEW CERTIFICATE REQUEST—- and —-END NEW CERTIFICATE REQUEST—- which you see after opening.
-
Order Your SSL Certificate
Now, you can place an order for an SSL certificate. Depending on the type of SSL certificate you’ve chosen, issuance can take anywhere from a few minutes to 5 business days.
Once issued you can proceed further to install SSL on Heroku server.
How to Install an SSL Certificate on Heroku Server
Before you begin the process of installing SSL on Heroku server, you’ll need to make sure you have certain files ready:
- Main certificate (with .crt extension)
- CA Bundle file (contains intermediate and root certificates)
- Private key file (generated with the same CSR)
These files you typically get in an email once a CA (Certificate Authority) validates your SSL request.
Before you begin the SSL installation process, make sure an SSL endpoint is set up on your Heroku server. Those familiar with the Heroku server may already know how to configure SSL and add-ons like SSL Endpoint.
Let’s go through the steps and learn how to install an SSL certificate on Heroku server.
Step 1: Combining Certificates
The CA Bundle and the primary certificate should be combined in a single file before you begin the SSL installation process. You can do this manually using a text editor like Notepad or automate it via the command line.
Method 1: Manual Method
- Open both the main certificate file (.crt) file & the CA Bundle file (.ca-bundle) with the Notepad
- Copy the CA Bundle content and paste it below the content of the main certificate file
- Now, save the combined file without giving any space between the codes.
Method 2: Command Line Method
If you prefer automation, you can run the below code in the command line to combine files:
cat yourcertificate.crt bundle.ca-bundle > server.crt
This will create a single file named server.crt that contains both the main certificate and the CA Bundle.
Step 2: SSL Certificate Installation
Heroku offers two methods for installing an SSL certificate: the Dashboard or the Command Line Interface (CLI). Let’s understand both methods, starting with the Dashboard method, which is quite easy to understand.
Method 1: Installing SSL Using Heroku Dashboard
-
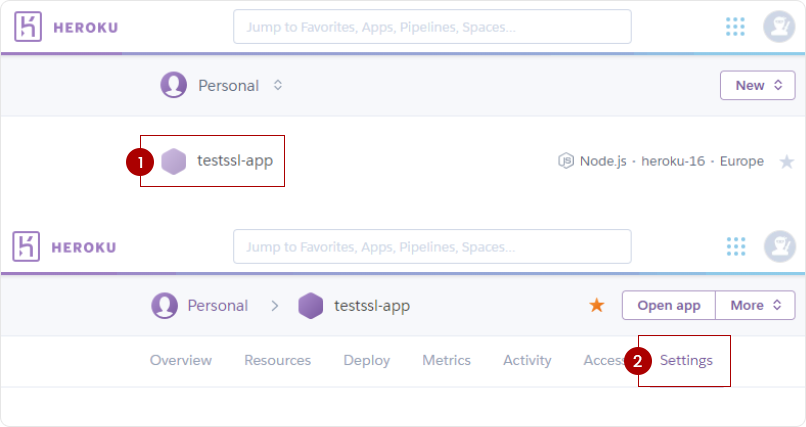
Open your Heroku account and navigate to the Dashboard.
- After that select the application and click on Settings.
-
After scrolling down to Domains and Certificates, Click on Configure SSL.
-
Go through the list of Configure SSL sections, select the Manual option, click on the radio button, which is beside it, and then click on Continue.
-
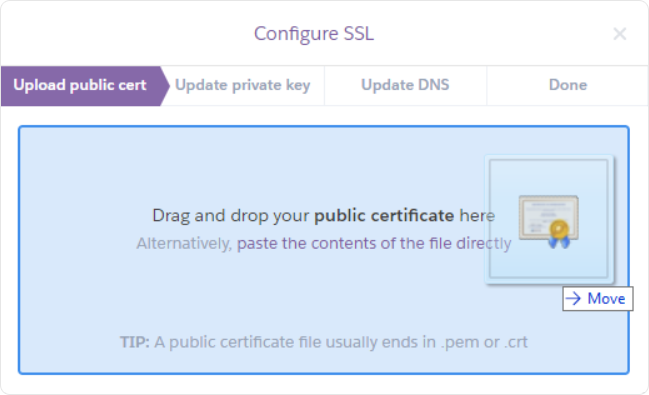
Drag & drop both the certificate and the CA Bundle within the provided box.
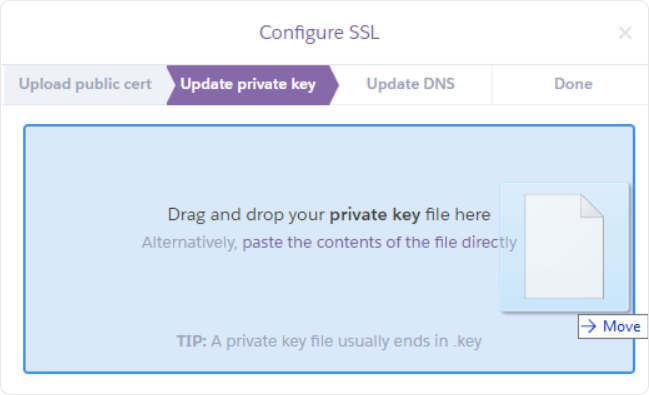
- Now, drag & drop the Private Key file within the box.
- For your custom domain and sub-domain, update the DNS records.
- Host: Refers to your domain or subdomain.
- Target: Typically, in the format of your-domain-or-subdomain.herokudns.com.
For example, when setting up DNS, you will need to create CNAME records within the DNS settings.
To put it simply, follow this guideline:
domain-example.com CNAME domain-example.com.herokudns.com
Or
www.domain-example.com CNAME www.domain-example.com.herokudns.com
Once you configure the DNS, click on the I’ve done this and then click on Continue. Please note that DNS changes may take some time to propagate globally, typically ranging from a few minutes to 48 hours, depending on your DNS provider.
Method 2: To Install an SSL Certificate on Heroku Server Using the Command Line Interface (CLI)
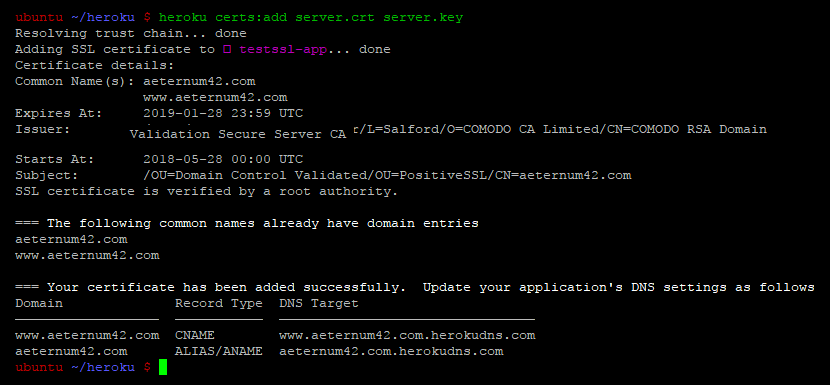
- For uploading the combined certificates and the CA Bundle file with the Private Key, execute the command:
heroku certs:add server.crt server.key
- In case you don’t have a Heroku app by default, you can make use of the -app flag for specifying it.
heroku certs:add server.crt server.key --app yourappname
- To verify whether the correct certificate is installed or not, execute the command:
heroku certs:info
Note: Sometimes user complains about getting an “Internal server error” when they upload the certificate. It’s mainly because of an outdated CLI version. So, it’s recommended that you use the latest updated version for troubleshooting or preventing such errors.
Step 3: Install an SSL Certificate on the SSL Endpoint
For installing an SSL certificate on an SSL Endpoint, first you’ll be required to create it. Run the below command in the local environment prompt:
$ heroku addons:create ssl:endpoint
-
After uploading the .crt file within the SSL directory of the application, complete the setup and combine the CA bundle certificate with the main certificate in a single file.
$ cat your-domain.crt bundle.crt > server.crt
This command will combine the main certificate and CA bundle into a single file (server.crt) that you can use for an SSL endpoint.
-
Now, import the private key & the certificate to the endpoint. For importing, the command is:
$ heroku certs:add server.crt private.key
If it’s correct, you’ll find the details of the SSL certificates, which include the hostname that is selected for the SSL endpoint and its expiry date. This process of endpoint creation may take up to 30 minutes to 2 hours to complete.
-
Once you set up an SSL endpoint, you’ll need to redirect the request for the secured domain to the hostname of the Heroku endpoint. If you haven’t already added your domain to the app, then run the below command:
$ heroku domains:add www.your-domain.com
Once you run this above code, your domain will be added to the app, and it’ll display the confirmation for the same as:
Adding www.name-of-domain-you-added.com to yourdomain… done
-
Now, you’ll need to create a CNAME record for redirecting requests to the endpoint hostname. Hence, make sure you replace “name-of-domain-you-added” with actual information. Similarly, here is how you do it:
- Record type – CNAME
- Name – www
- Target – name-of-domain-you-added.herokussl.com
- For Wildcard Certificates, create a similar record:
- Record type – CNAME
- Name – *
- Target – name-of-domain-you-added.herokussl.com
To set up a CNAME record for the root domain (@), keep in mind that it will override any other records associated with that domain. Therefore, if you’re configuring a CNAME for a subdomain, assure that your SSL certificate also covers the subdomain. For instance, if you’re working with “www.example.com” and the subdomain “sub.example.com,” or a wildcard domain “*.example.com,” the SSL certificate should support those subdomains.
For a bare domain (e.g., “example.com”), it’s possible to set up an SSL certificate, but you’ll need DNS support that enables CNAME-like functionality at the zone apex. This feature, often called “zone apex CNAME,” allows you to create a CNAME record for the root domain, redirecting requests to an SSL endpoint (like Heroku’s SSL endpoint) without running into issues that would normally arise when using standard DNS records.
Key points to note:
- A CNAME record at the root domain will override other DNS records for that domain.
- SSL certificates should cover both the main domain and its subdomains.
- Zone apex CNAME functionality is required for root domain CNAME records to work seamlessly, especially with platforms like Heroku.
- DNS configuration for a root domain is critical for correct redirection to SSL endpoints.
Wrapping Up
That’s it! Those who have read till here may have understood how to install an SSL certificate on Heroku server. Similarly, you can go to the free SSL Checker tool and make sure that the SSL certificate on the Heroku server is working correctly.
