Internet Information Services (IIS) is Microsoft’s powerful platform for hosting, deploying, and managing websites and web applications on the Windows operating system. Also known as Windows Web Server, it supports a wide range of technologies like ASP.Net, PHP, Python, and Node.js, offering broad functionality to host everything from simple static websites to complex web applications.
Whether you’re hosting a small website or managing enterprise-level applications, securing your IIS server with HTTPS is a must for data privacy and trust. If you’re new to server management, enabling HTTPS might seem daunting at first. So, in this blog will walk you through the steps to enable HTTPS on IIS, providing clear instructions and helpful tips along the way. Let’s get started!
Points to Consider to Enable HTTPS on IIS
- IIS 8.5 on Windows Server 2012 R2 or versions below that aren’t compatible with HTTP/2 protocol.
- Support for HTTP/2 is available in Windows Server 2016 & Windows 10.
- Presently, IIS only supports HTTP2 and not Transport Layer Security.
- As of now, there are no exclusive configuration settings for HTTP/2, and there’s no need for a DuoEnabled registry key. Hence, it’s recommended to set it to 1.
- In case your browser and server both support HTTP/2, then IIS will use it automatically. However, it’ll return to HTTP1.1 if it’s not supported.
- If you’re using Windows authentication methods such as Kerberos, NTLM, & Negotiate and have HTTP/2 enabled on IIS, then IIS will revert back to HTTP/1.1, and such methods won’t support HTTP/2.
- To limit the bandwidth by using the IIS feature works with HTTP/1.1 but not with HTTP/2.
Enable HTTP/2 on the IIS Web Server
Follow the three steps mentioned for enabling HTTP/2 on IIS:
- Install IIS Manager (Internet Information Service Manager)
- A self-sign SSL certificate needs to be created
- Bind the created self-signed SSL certificate
Now, let’s understand how to perform each step in detail.
Step 1: Install IIS Manager (Internet Information Service Manager)
Go through below mentioned steps and install IIS Manager.
- On the taskbar, click on Search
- Press Enter after typing Turn Windows features on or off
-
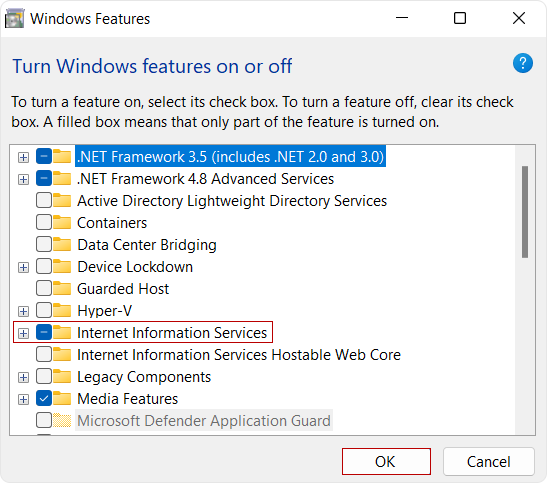
A dialog box named Windows Features will pop up
- Go to the option Internet Information Services and check the box to select
- Click the OK button on the right bottom side of the pop-up box
Step 2: Create a Self-Signed SSL Certificate
An SSL/TLS certificate signed by the website owner is known as a self-signed SSL certificate. These self-signed certificates are usually used on websites that are for internal usage, like LAN networks within an organization or testing purposes.
Suppose the website communicates outside the company network. In that case, a self-signed certificate won’t be trusted, and you’ll not have any option to verify that the website issuing the SSL certificate is of the website owner itself, who they claim to be.
However, for testing reasons or any other reason, like when the server is behind the firewall cannot use the SSL certificate issued by a globally respected certificate like Sectigo or DigiCert – you can go through the below steps to create a self-signed SSL certificate.
Attention:
It’s best to avoid using self-signed certificates, as they trigger security warnings and aren’t considered reliable.
- On the taskbar, click on Search
- Type IIS Manager in that Search option and press Enter
- The IIS Manager (Internet Information Service Manager) window will open
- Within the IIS Manager window, perform below steps:
- On Server Certificates, click
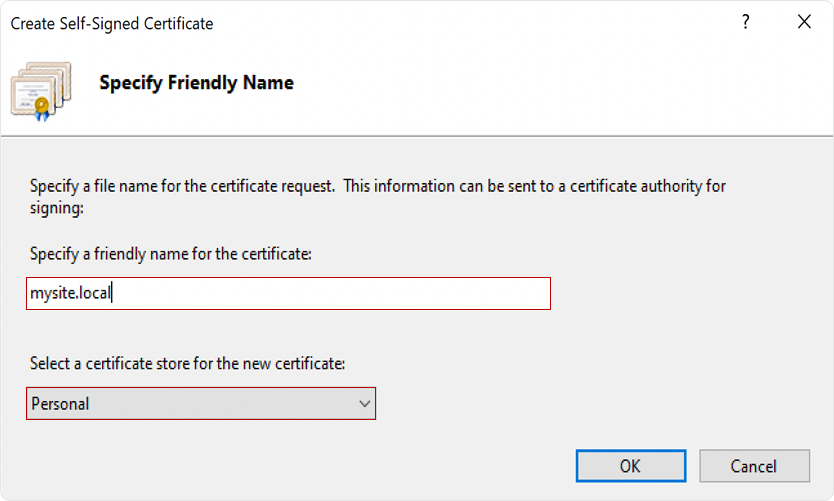
- Click Self-Signed Certificates in the column named Actions
- In a field name, specify a friendly name of the certificate, and type an easy-to-remember name of your choice
- Select Web Hosting from the list of Select a certificate store for the new certificate
- Click OK button
Step 3 : Bind Your Created Self-Signed Certificate
Now, to make use of the created self-signed SSL certificate, you’ll need to bind it with the website. Each web server has its own procedure for loading an SSL certificate and binding it with a website.
- Expand Sites within the Connections column
- Select & click Default Web Site
- Click Bindings under the Actions column
- Once you click on the Bindings, the dialog box named Site Binding will appear.
- Click Add
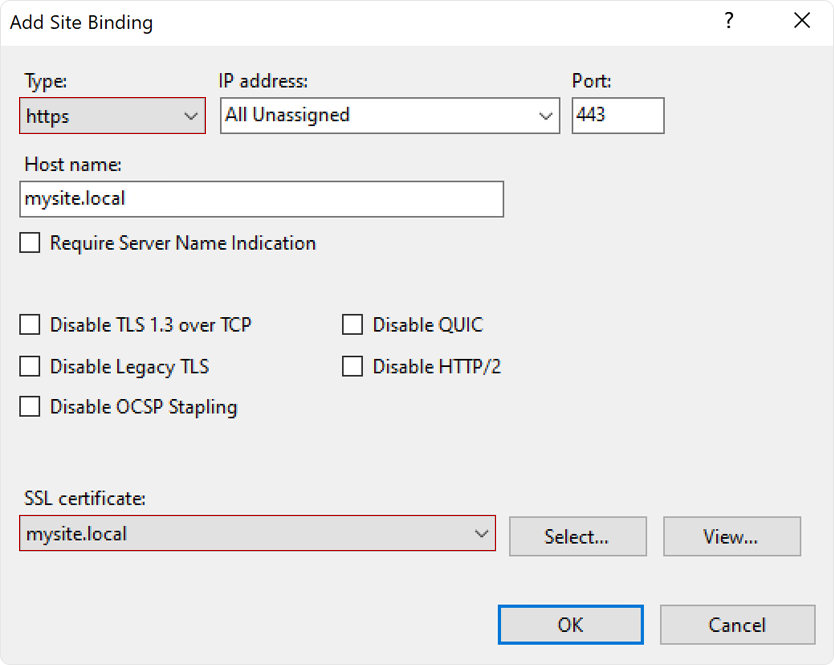
- Next, the dialog box name Add Site Binding will pop up
- Select https from the list named Type
- From the list of SSL certificates, select the name of the self-signed SSL certificate that you created.
- Click the OK button.
How Can You Check if HTTP/2 Is Enabled?
For verifying whether HTTP/2 is enabled, you can go with the Developer Tools option of the Google Chrome web browser. For that, follow the below steps to verify the same.
- Open a new tab in Google Chrome
- Enter websites URL
- Click the three vertical dots at the top right side (Customize and control Google Chrome)
- From the list, select the option More tools >> Developer Tools
- In the Developer Tools, select the tab Network tab
Once the Network tab opens, look at the Protocol column and observe the value. If it’s showing as h2, then it’s verified that HTTP/2 is enabled in IIS.
Are HTTP/S and HTTP/2 Same?
HTTP/S helps secure the connection between the client and server, so data transmitted is secure. While HTTP/2 allows one to request multiple files at once. Hence, it significantly enhances both website performance and server efficiency.
The latest IIS 10 supports the HTTP/2 protocol and offers lower latency compared to HTTP1.1, which helps improve resource utilization. Hence, this article has widely explored How to enable HTTP/2 protocol on IIS.
Wrapping Up
Enabling HTTP/2 within IIS is not a tricky task. It can be done through three simple steps. For instance, first, install IIS Manager, make a self-signed certificate, and bind that certificate you created. We’ve also covered why we focus more on HTTP/2 instead of answering questions on how to enable HTTP/s on IIS. We hope this article answers your questions.


