Google has now decided to make the most of its services with SSL encryption. After implementing HTTPS to Google’s search engine, Gmail, Google Drive, and Adwords, now Google has enabled HTTPS to Blogger or BlogSpot, whatever you call it.
Google considers security as its top priority and has been enduring to put its efforts to make the global internet world secure, which is also a fight against rising cyber crime. As a result, Google always tries to secure its product and services with “HTTPS Everywhere”, which gives users a secure environment over the web.
Google’s Blogger platform has been present since 1999 and offers a free content management system to start an own blog. With HTTPS Everywhere concept, Bloggers and readers will get below advantages.
Advantages of HTTPS in Blogger:
- Earlier, bloggers were facing an issue of ISP block, which will be averted with HTTPS and bloggers can write content without being interrupted by this issue.
- Moreover, HTTPS will secure readers from stopping traffic from unauthorized redirection and malware injection.
- It will secure users’ actions and communications.
How to Enable HTTPS in Blogger:
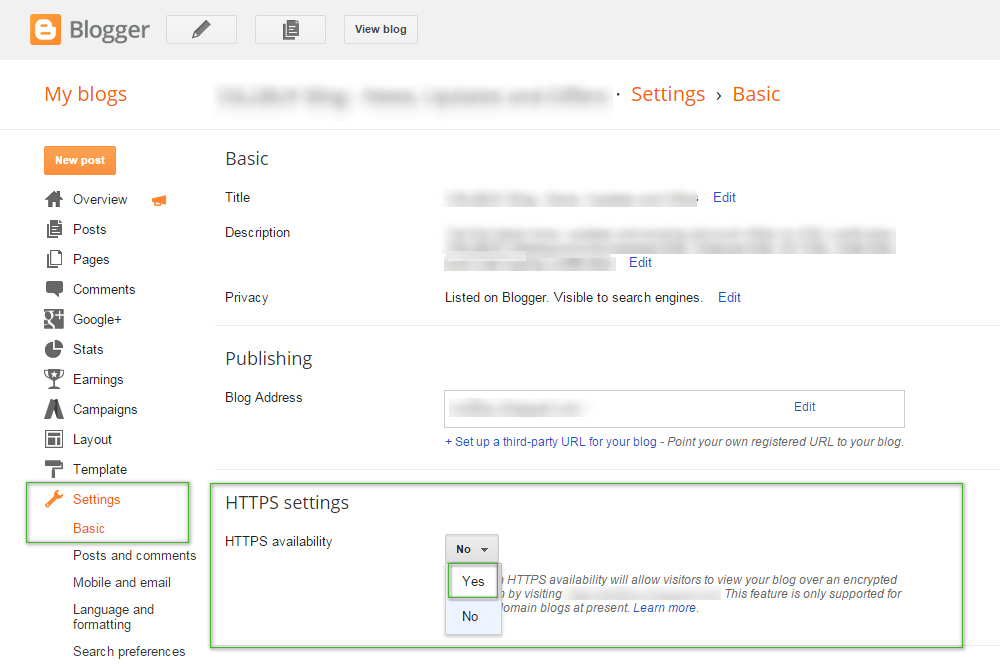
To enable HTTPS in your blog, you have to follow the simple steps shown below.
- Frist, sign-in to your Blogger account.
- Choose the blog to enable HTTPS support.
- Browse “Settings > Basic” section where you will find “HTTPS settings”.
- Click on the drop-down menu shown beside “HTTPS Availability” and select “Yes“.
Once you enable HTTPS feature for your blog, it will be accessed with the encrypted version such https://your.blogspot.com.
Solve Mixed Content Error in Blogger:
However, the HTTPS enabling feature is not available for third-party custom domain users. You may face “Mixed content” error due to Javascript content and HTML markup which originates from the template, gadget, page and post source. To fix this error, Google has presented a guideline with Google support.
